Release 9.2.0
Part Number A96670-01
 Home |
 Book List |
 Contents |
 Index |
 Master Index |
 Feedback |
| Oracle Enterprise Manager Administrator's Guide Release 9.2.0 Part Number A96670-01 |
|
The Group system lets you organize the objects you manage into logical categories for more efficient management and administration. You can organize groups based on any criteria you determine, such as function, department, geographical location, or number of administrators. You can then place the groups on a map or graphical view of the network making it easy to locate, diagnose, and act on encountered conditions. The system also lets you assign jobs to groups and monitor their status. The Groups system is especially useful for managing environments with many databases and services.
The topics discussed in this chapter include:
The Group view pane provides a graphical custom view of your managed environment and is displayed when any group is selected in the Console Navigator. As with any object in the Navigator, the appropriate group view is displayed in the detail area of the Console. See Figure 4-1, "Navigator and Group Panes" for an illustration of a Group view.
Note that groups are also displayed in the Navigator. To display the members of a group in this pane, expand the group by clicking the "+" symbol next to the group name. By default, the Group folder is empty.

Text description of the illustration group2.gif
A group is a collection of targets, such as databases, listeners, nodes or HTTP servers, that share a common location or function. You can create, modify, and remove groups to further organize your network view. Different types of objects, like databases and listeners, can be grouped together.
Groups appear in two places: the Navigator and the Group View pane, once a group is created.
A group is represented in the Navigator by an icon and a name. You can double-click on the group's icon to expand the group, and view and update the group's members and sub-groups.
The Group View pane gives you a graphical view of the objects in the group and their individual status. You can also add background maps to the Group pane to better visualize locations of particular objects.
Grouping nodes or services can simplify tasks that are applied to all members of the group. For example, in order to execute a SQL script on all the databases in the CHI_MAIL group, you can use the Job Scheduling services to schedule a job on the group. The job that executes the SQL script is scheduled on all the databases in the group. The job will not be applied to any other objects in the group.
|
Note: Jobs and events applied to a target before it joins a group will not be applied to the group retroactively. You must re-apply any jobs or events you want to apply to the entire group. |
The Group View page can be refreshed automatically or manually.
The Group View page can be refreshed manually by clicking the Refresh button located at the bottom of the Group View page. When you refresh manually, only the currently selected group is refreshed.
When refreshed automatically, all group views currently open for viewing by the administrator are refreshed.
Automatic refresh, along with the refresh frequency, can be set from the Group View page or from the General page of the Edit Administrator Preferences property sheet. Administrators can set a refresh interval greater than or equal to the minimum refresh interval set for all administrators by the Super Administrator. The minimum refresh interval can be changed from the General page of the Edit Administrator Preferences property sheet. Changing the minimum refresh interval can only be performed by Super Administrators. By default, the minimum refresh interval is five minutes.
In general, it is best to refresh group views manually. However, for situations where a Group View page needs to be displayed for extended monitoring periods, automatic refresh can be used.
|
Important: Setting an automatic refresh frequency too high (low interval value) may impact network and system performance. |
To create a group:
Once the group has been defined, it appears in the Navigator. Selecting the group in the Navigator displays the View, General, and Access pages for that specific group in the detail view. You can modify the group as needed.
To add an object to a group, click on the General tab. Select the desired object(s) from the Available Targets list, and then click Add. Alternatively, you can drag and drop objects within the Navigator to any group.
To add an existing group to another existing group, you can drag and drop one group to another within the Navigator. To add an existing group to a new group, select the desired group from the Available Targets list on the General page and click Add.
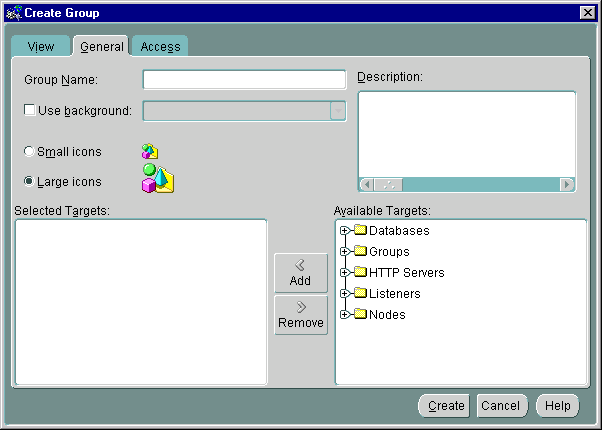
Text description of the illustration crtegrp.gif
This page allows you to define the group and its content. The General page consists of the following:
Enter a unique name for the new group in the Group Name field of the dialog box.
Check this option if you want to display an image in the background of the group's View pane. When checked, you can select one of the standard images from the drop-down list. These standard files are provided in the oracle_home\classes\oracle\sysman\resources\images directory located on both the machine running the client Console and the machine running the Management Server. The Java-based Console reads the images from the local images directory. The browser-based Console reads the images from the machine running the Management Server.
The sample images included are:
You do not need to specify an explicit path for graphics located in this directory. Specify only the file name, such as usa.gif. You can use .GIF or .JPG graphic files. When a new image is added to a group, the file name is stored in the repository.
Determine whether you want to display large or small icons in the group.
List of targets that have been added to the group.
Tree list displaying all targets and existing groups that can be added to the current group.
Moves objects selected in the Available Targets list to the Selected Targets list.
Moves objects from the Selected Targets list back to the Available Targets list.
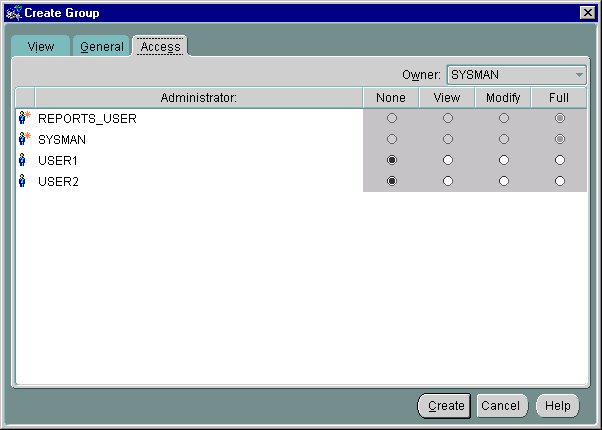
Determine the permissions that you want to assign to the group with the Access page. This allows other users to view or modify the group. Any permissions assigned on this page over-write any user default permissions. See "Access" for an explanation of the permissions that can be assigned.
Text description of the illustration grouper.gif
Groups are populated by adding targets from the specific group's Available Targets list on the General page. Groups can also be populated by dragging and dropping databases, groups, nodes, listeners or any other discovered targets in the Navigator into the appropriate group in the Navigator Groups folder. You can create, update, and save any number of groups. In addition, you can add a graphic as a background to the group for visual identification or to graphically show the location of nodes. For example, you can use a group drawing of a city or state for the background of your group. Once a group is created, it can be manipulated like any other object in the Navigator.
Probably the most important aspect of the Enterprise Manager Group system is that it provides an efficient way to monitor the alerts reported by the event system. If the object or group has events registered against it, a flag showing the state of the event condition is displayed. If an object in a group has more than one event registered against it, the flag will represent the most severe alert condition.
Groups inherit the worst state of any of the members. If one target in a group is down (status of the target is unknown), the group displays a gray flag.
|
Note: For status monitors to display on a group or object, an Intelligent Agent must be running on the node where the object is located. |
See Chapter 6, "Events" for more information on events.
Some group objects, such as database objects and defined group objects, can be expanded in the Group detail view by double-clicking on the object's icon. You can double-click on some objects to open property sheets. The property sheets allow you to both view and alter the properties of the objects. You can double-click on databases to display property sheets.
Some group objects, such as databases, can also be expanded within the Console Navigator. All groups appear in the Navigator's Group container.
See Figure 4-1, "Navigator and Group Panes" for an illustration of an expanded node in the Group pane.
When you double-click on a group icon, the Edit Group property sheet displays for that group. You can add or remove objects from the group via the Available/Selected Targets lists on the General page. In addition, you can delete objects from the group by selecting them and pressing the Delete key, or clicking the right mouse button and selecting Remove Item from Group.
When you double-click on a database or other discovered target within a group, you connect to that service. The instance property sheet displays if that service is a database. If the connection to the database fails for any reason, the Login Information dialog box displays. See "Preferred Credentials" for information on preferred credentials.
You can launch a database application using an object in the group. Select a database icon in the Group View pane, then select a tool from the Console Tools menu or Tool drawers. You are connected to the database according to the user credentials that have been set up for the system. See "Preferred Credentials" for more information on user credentials.
To add objects to a group, drag and drop the object from its location on the Navigator to the group.
When you add objects in a group, the updates are reflected in every occurrence of the group. Any updates to a group are automatically saved as the updates are made.
To delete objects in a group view pane, you can select the object and press the Delete key, choose Remove Item from Group from the context-sensitive menu, or remove items from the Selected Targets list on the General page. Objects in the Navigator can be removed via context-sensitive menu option or by selecting the object and pressing the Delete key.
You can modify the properties of a group.
There are two types of group removal:
After you select a group, there are multiple ways to remove it:
If you have already configured the Enterprise Manager Reporting website, you can view a variety of generated reports for objects within the group. See Chapter 8, "Enterprise Manager Reporting" for more information.
|
 Copyright © 1996, 2002 Oracle Corporation. All Rights Reserved. |
|

