Release 2 (9.2)
Part Number A96652-01
 Home |
 Book List |
 Contents |
 Index |
 Master Index |
 Feedback |
| Oracle9i Database Utilities Release 2 (9.2) Part Number A96652-01 |
|
This chapter describes how to use the Import utility to read an export file into an Oracle database. Import only reads files created by the Export utility. For information on how to export a database, see Chapter 1. To load data from other operating system files, see the discussion of SQL*Loader in Part II of this manual.
This chapter discusses the following topics:
The Import utility reads the object definitions and table data from an Export dump file. It inserts the data objects into an Oracle database.
Figure 2-1 illustrates the process of importing from an Export dump file.
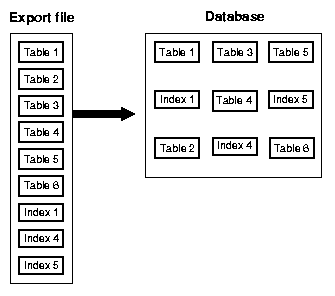
Text description of the illustration sut81013.gif
Export dump files can only be read by the Oracle Import utility. The version of the Import utility cannot be earlier than the version of the Export utility used to create the dump file.
Import can read export files created by Export release 5.1.22 and higher.
To read load data from ASCII fixed-format or delimited files, use the SQL*Loader utility.
Table objects are imported as they are read from the export file. The export file contains objects in the following order:
First, new tables are created. Then, data is imported and indexes are built. Then triggers are imported, integrity constraints are enabled on the new tables, and any bitmap, functional, and/or domain indexes are built. This sequence prevents data from being rejected due to the order in which tables are imported. This sequence also prevents redundant triggers from firing twice on the same data (once when it is originally inserted and again during the import).
For example, if the emp table has a referential integrity constraint on the dept table and the emp table is imported first, all emp rows that reference departments that have not yet been imported into dept would be rejected if the constraints were enabled.
When data is imported into existing tables, however, the order of import can still produce referential integrity failures. In the situation just given, if the emp table already existed and referential integrity constraints were in force, many rows could be rejected.
A similar situation occurs when a referential integrity constraint on a table references itself. For example, if scott's manager in the emp table is drake, and drake's row has not yet been loaded, scott's row will fail, even though it would be valid at the end of the import.
Before you begin using Import, be sure you take care of the following items:
Additionally, before you begin using Import, you should read the following sections:
To use Import, you must run either the script catexp.sql or catalog.sql (which runs catexp.sql) after the database has been created or migrated to Oracle9i.
|
Note: The actual names of the script files depend on your operating system. The script filenames and the method for running them are described in your Oracle operating system-specific documentation. |
The catexp.sql or catalog.sql script needs to be run only once on a database. You do not need to run either script again before performing future import operations. Both scripts perform the following tasks to prepare the database for Import:
IMP_FULL_DATABASE role.IMP_FULL_DATABASE to the DBA role.This section describes the privileges you need to use the Import utility and to import objects into your own and others' schemas.
To use Import, you need the privilege CREATE SESSION to log on to the Oracle database server. This privilege belongs to the CONNECT role established during database creation.
You can do an import even if you did not create the export file. However, keep in mind that if the export file was created by a user with EXP_FULL_DATABASE privilege, then you must have IMP_FULL_DATABASE privilege to import it. Both of these privileges are typically assigned to DBAs.
Table 2-1 lists the privileges required to import objects into your own schema. All of these privileges initially belong to the RESOURCE role.
To import the privileges that a user has granted to others, the user initiating the import must either own the objects or have object privileges with the WITH GRANT OPTION. Table 2-2 shows the required conditions for the authorizations to be valid on the target system.
To import objects into another user's schema, you must have the IMP_FULL_DATABASE role enabled.
To import system objects from a full database export file, the role IMP_FULL_DATABASE must be enabled. The parameter FULL specifies that these system objects are included in the import when the export file is a full export:
This section describes factors to take into account when you import data into existing tables.
When you choose to create tables manually before importing data into them from an export file, you should use either the same table definition previously used or a compatible format. For example, although you can increase the width of columns and change their order, you cannot do the following:
NOT NULL columnsLONG to NUMBER, for example)DEFAULT column values
In the normal import order, referential constraints are imported only after all tables are imported. This sequence prevents errors that could occur if a referential integrity constraint existed for data that has not yet been imported.
These errors can still occur when data is loaded into existing tables. For example, if table emp has a referential integrity constraint on the mgr column that verifies that the manager number exists in emp, a perfectly legitimate employee row might fail the referential integrity constraint if the manager's row has not yet been imported.
When such an error occurs, Import generates an error message, bypasses the failed row, and continues importing other rows in the table. You can disable constraints manually to avoid this.
Referential constraints between tables can also cause problems. For example, if the emp table appears before the dept table in the export file, but a referential check exists from the emp table into the dept table, some of the rows from the emp table may not be imported due to a referential constraint violation.
To prevent errors like these, you should disable referential integrity constraints when importing data into existing tables.
When the constraints are reenabled after importing, the entire table is checked, which may take a long time for a large table. If the time required for that check is too long, it may be beneficial to order the import manually.
To do so, perform several imports from an export file instead of one. First, import tables that are the targets of referential checks. Then, import the tables that reference them. This option works if tables do not reference each other in a circular fashion, and if a table does not reference itself.
Triggers that are defined to trigger on DDL events for a specific schema or on DDL-related events for the database are system triggers. These triggers can have detrimental effects on certain Import operations. For example, they can prevent successful re-creation of database objects, such as tables. This causes errors to be returned that give no indication that a trigger caused the problem.
Database administrators and anyone creating system triggers should verify that such triggers do not prevent users from performing database operations for which they are authorized. To test a system trigger, take the following steps:
You can invoke Import and specify parameters by using any of the following methods:
Before you use one of these methods to invoke Import, be sure to read the descriptions of the available parameters. See Import Parameters.
You can specify all valid parameters and their values from the command line using the following syntax:
impusername/passwordPARAMETER=value
or
impusername/passwordPARAMETER=(value1,value2,...,valuen)
The number of parameters cannot exceed the maximum length of a command line on the system.
If you prefer to let Import prompt you for the value of each parameter, you can use the following syntax to start Import in interactive mode:
imp username/password
Import will display each parameter with a request for you to enter a value. This method exists for backward compatibility and is not recommended because it provides less functionality than the other methods. See Using the Interactive Method for more information.
You can specify all valid parameters and their values in a parameter file. Storing the parameters in a file allows them to be easily modified or reused, and is the recommended method for invoking Import. If you use different parameters for different databases, you can have multiple parameter files.
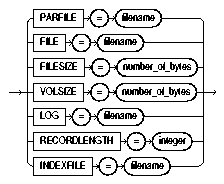
Create the parameter file using any flat file text editor. The command-line option PARFILE=filename tells Import to read the parameters from the specified file rather than from the command line. For example:
imp PARFILE=filenameimpusername/passwordPARFILE=filename
The first example does not specify the username/password on the command line to illustrate that you can specify them in the parameter file, although, for security reasons, this is not recommended.
The syntax for parameter file specifications is one of the following:
PARAMETER=valuePARAMETER=(value) PARAMETER=(value1,value2,...)
The following example shows a partial parameter file listing:
FULL=y
FILE=dbay
INDEXES=y
CONSISTENT=y
You can add comments to the parameter file by preceding them with the pound (#) sign. Import ignores all characters to the right of the pound (#) sign.
You can specify a parameter file at the same time that you are entering parameters on the command line. In fact, you can specify the same parameter in both places. The position of the PARFILE parameter and other parameters on the command line determines which parameters take precedence. For example, assume the parameter file params.dat contains the parameter INDEXES=y and Import is invoked with the following line:
imp username/password PARFILE=params.dat INDEXES=n
In this case, because INDEXES=n occurs after PARFILE=params.dat, INDEXES=n overrides the value of the INDEXES parameter in the parameter file.
See Also:
|
SYSDBA is used internally and has specialized functions; its behavior is not the same as for generalized users. Therefore, you should not typically need to invoke Import as SYSDBA, except in the following situations:
To invoke Import as SYSDBA, use the following syntax, adding any desired parameters or parameter filenames:
imp \'username/password AS SYSDBA\'
Optionally, you could also specify an instance name:
imp \'username/password@instance AS SYSDBA\'
If either the username or password is omitted, Import will prompt you for it.
This example shows the entire connect string enclosed in quotation marks and backslashes. This is because the string, AS SYSDBA, contains a blank, a situation for which most operating systems require that the entire connect string be placed in quotation marks or marked as a literal by some method. Some operating systems also require that quotation marks on the command line be preceded by an escape character. In this example, backslashes are used as the escape character. If the backslashes were not present, the command-line parser that Export uses would not understand the quotation marks and would remove them before calling Export.
See your Oracle operating system-specific documentation for more information about special and reserved characters on your system.
If you prefer to use the Import interactive mode, see Using the Interactive Method.
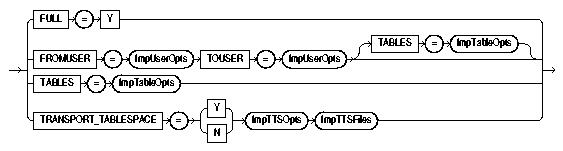
The Import utility provides four modes of import.
IMP_FULL_DATABASE role can import in this mode, which imports a full database export dump file. Use the FULL parameter to specify this mode.TRANSPORT_TABLESPACE parameter to specify this mode.FROMUSER parameter to specify this mode.TABLES parameter to specify this mode.
All users can import in table mode and user mode. Users with the
IMP_FULL_DATABASE role (privileged users) can import in all modes.
A user with the IMP_FULL_DATABASE role must specify one of these modes. Otherwise, an error results. If a user without the IMP_FULL_DATABASE role fails to specify one of these modes, a user-level import is performed.
The objects that are imported depend on the Import mode you choose and the mode that was used during the export.
See Also:
|
Import provides online help. Enter imp HELP=y on the command line to invoke it.
The following diagrams show the syntax for the parameters that you can specify in the parameter file or on the command line. Following the diagrams are descriptions of each parameter.

Text description of the illustration impstart.gif
Text description of the illustration impmodes.gif
Text description of the illustration impuseop.gif
Text description of the illustration imptabop.gif

Text description of the illustration impttsop.gif
Text description of the illustration imptts.gif

Text description of the illustration impopts.gif
Text description of the illustration impopts_cont.gif
Text description of the illustration impfilop.gif
The following sections describe parameter functionality and default values.
Default: operating system-dependent
The integer specified for BUFFER is the size, in bytes, of the buffer through which data rows are transferred.
BUFFER determines the number of rows in the array inserted by Import. The following formula gives an approximation of the buffer size that inserts a given array of rows:
buffer_size = rows_in_array * maximum_row_size
For tables containing LONG, LOB, BFILE, REF, ROWID, UROWID, or DATE columns, rows are inserted individually. The size of the buffer must be large enough to contain the entire row, except for LOB and LONG columns. If the buffer cannot hold the longest row in a table, Import attempts to allocate a larger buffer.
|
Note: See your Oracle operating system-specific documentation to determine the default value for this parameter. |
This parameter applies to Oracle version 5 and 6 export files only. Use of this parameter is not recommended. It is provided only for compatibility with previous versions. Eventually, it will no longer be supported. See The CHARSET Parameter if you still need to use this parameter.
Default: n
Specifies whether Import should commit after each array insert. By default, Import commits only after loading each table, and Import performs a rollback when an error occurs, before continuing with the next object.
If a table has nested table columns or attributes, the contents of the nested tables are imported as separate tables. Therefore, the contents of the nested tables are always committed in a transaction distinct from the transaction used to commit the outer table.
If COMMIT=n and a table is partitioned, each partition and subpartition in the Export file is imported in a separate transaction.
Specifying COMMIT=y prevents rollback segments from growing inordinately large and improves the performance of large imports. Specifying COMMIT=y is advisable if the table has a uniqueness constraint. If the import is restarted, any rows that have already been imported are rejected with a recoverable error.
If a table does not have a uniqueness constraint, Import could produce duplicate rows when you reimport the data.
For tables containing LONG, LOB, BFILE, REF, ROWID, UROWID, or DATE columns, array inserts are not done. If COMMIT=y, Import commits these tables after each row.
Default: y
Specifies whether or not Import should compile packages, procedures, and functions as they are created.
If COMPILE=n, these units are compiled on their first use. For example, packages that are used to build domain indexes are compiled when the domain indexes are created.
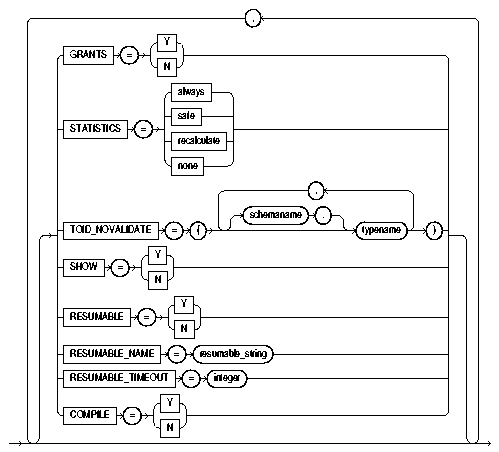
Default: y
Specifies whether or not table constraints are to be imported. The default is to import constraints. If you do not want constraints to be imported, you must set the parameter value to n.
Note that primary key constraints for index-organized tables (IOTs) and object tables are always imported.
Default: none
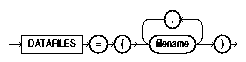
When TRANSPORT_TABLESPACE is specified as y, use this parameter to list the datafiles to be transported into the database.
Default: n
Specifies whether or not the existing datafiles making up the database should be reused. That is, specifying DESTROY=y causes Import to include the REUSE option in the datafile clause of the CREATE TABLESPACE statement, which causes Import to reuse the original database's datafiles after deleting their contents.
Note that the export file contains the datafile names used in each tablespace. If you specify DESTROY=y and attempt to create a second database on the same system (for testing or other purposes), the Import utility will overwrite the first database's datafiles when it creates the tablespace. In this situation you should use the default, DESTROY=n, so that an error occurs if the datafiles already exist when the tablespace is created. Also, when you need to import into the original database, you will need to specify IGNORE=y to add to the existing datafiles without replacing them.
|
Caution: If datafiles are stored on a raw device, |
Default: 0 (zero)
Specifies that Import should display a progress meter in the form of a period for n number of rows imported. For example, if you specify FEEDBACK=10, Import displays a period each time 10 rows have been imported. The FEEDBACK value applies to all tables being imported; it cannot be set on a per-table basis.
Default: expdat.dmp
Specifies the names of the export files to import. The default extension is .dmp. Because Export supports multiple export files (see the following description of the FILESIZE parameter), you may need to specify multiple filenames to be imported. For example:
imp scott/tiger IGNORE=y FILE = dat1.dmp, dat2.dmp, dat3.dmp FILESIZE=2048
You need not be the user who exported the export files; however, you must have read access to the files. If you were not the exporter of the export files, you must also have the IMP_FULL_DATABASE role granted to you.
Default: operating-system dependent
Export supports writing to multiple export files, and Import can read from multiple export files. If, on export, you specify a value (byte limit) for the Export FILESIZE parameter, Export will write only the number of bytes you specify to each dump file. On import, you must use the Import parameter FILESIZE to tell Import the maximum dump file size you specified on export.
The FILESIZE value can be specified as a number followed by KB (number of kilobytes). For example, FILESIZE=2KB is the same as FILESIZE=2048. Similarly, MB specifies megabytes (1024 * 1024) and GB specifies gigabytes (1024**3). B remains the shorthand for bytes; the number is not multiplied to obtain the final file size (FILESIZE=2048B is the same as FILESIZE=2048).
For information on the maximum size of dump files, see FILESIZE.
Default: none
A comma-separated list of schemas to import. This parameter is relevant only to users with the IMP_FULL_DATABASE role. The parameter enables you to import a subset of schemas from an export file containing multiple schemas (for example, a full export dump file or a multischema, user-mode export dump file).
Schema names that appear inside functional indexes, functions, procedures, triggers, type bodies, views, and so on, are not affected by FROMUSER or TOUSER processing. Only the name of the object is affected. After the import has completed, items in any TOUSER schema should be manually checked for references to old (FROMUSER) schemas, and corrected if necessary.
You will typically use FROMUSER in conjunction with the Import parameter TOUSER, which you use to specify a list of usernames whose schemas will be targets for import (see TOUSER). However, if you omit specifying TOUSER, Import will:
FROMUSER schema if the export file is a full dump or a multischema, user-mode export dump fileFROMUSER schema on import) if the export file is a single-schema, user-mode export dump file created by an unprivileged user
Default: n
Specifies whether to import the entire export file.
Default: y
Specifies whether to import object grants.
By default, the Import utility imports any object grants that were exported. If the export was a user-mode Export, the export file contains only first-level object grants (those granted by the owner).
If the export was a full database mode Export, the export file contains all object grants, including lower-level grants (those granted by users given a privilege with the WITH GRANT OPTION). If you specify GRANTS=n, the Import utility does not import object grants. (Note that system grants are imported even if GRANTS=n.)
Default: none
Displays a description of the Import parameters. Enter imp HELP=y on the command line to invoke it.
Default: n
Specifies how object creation errors should be handled. If you accept the default, IGNORE=n, Import logs or displays object creation errors before continuing.
If you specify IGNORE=y, Import overlooks object creation errors when it attempts to create database objects, and continues without reporting the errors.
Note that only object creation errors are ignored; other errors, such as operating system, database, and SQL errors, are not ignored and may cause processing to stop.
In situations where multiple refreshes from a single export file are done with IGNORE=y, certain objects can be created multiple times (although they will have unique system-defined names). You can prevent this for certain objects (for example, constraints) by doing an import with CONSTRAINTS=n. If you do a full import with the CONSTRAINTS=n, no constraints for any tables are imported.
If a table already exists and IGNORE=y, then rows are imported into existing tables without any errors or messages being given. You might want to import data into tables that already exist in order to use new storage parameters or because you have already created the table in a cluster.
If a table already exists and IGNORE=n, then errors are reported and the table is skipped with no rows inserted. Also, objects dependent on tables, such as indexes, grants, and constraints, will not be created.
|
Caution: When you import into existing tables, if no column in the table is uniquely indexed, rows could be duplicated. |
Default: y
Specifies whether or not to import indexes. System-generated indexes such as LOB indexes, OID indexes, or unique constraint indexes are re-created by Import regardless of the setting of this parameter.
You can postpone all user-generated index creation until after Import completes, by specifying INDEXES=n.
If indexes for the target table already exist at the time of the import, Import performs index maintenance when data is inserted into the table.
Default: none
Specifies a file to receive index-creation statements.
When this parameter is specified, index-creation statements for the requested mode are extracted and written to the specified file, rather than used to create indexes in the database. No database objects are imported.
If the Import parameter CONSTRAINTS is set to y, Import also writes table constraints to the index file.
The file can then be edited (for example, to change storage parameters) and used as a SQL script to create the indexes.
To make it easier to identify the indexes defined in the file, the export file's CREATE TABLE statements and CREATE CLUSTER statements are included as comments.
Perform the following steps to use this feature:
INDEXFILE parameter to create a file of index-creation statements.connect strings.INDEXES=n.
(This step imports the database objects while preventing Import from using the index definitions stored in the export file.)
The INDEXFILE parameter can be used only with the FULL=y, FROMUSER, TOUSER, or TABLES parameters.
Default: none
Specifies a file to receive informational and error messages. If you specify a log file, the Import utility writes all information to the log in addition to the terminal display.
Default: none
Specifies a filename for a file that contains a list of Import parameters. For more information on using a parameter file, see Invoking Import.
Default: operating system dependent
Specifies the length, in bytes, of the file record. The RECORDLENGTH parameter is necessary when you must transfer the export file to another operating system that uses a different default value.
If you do not define this parameter, it defaults to your platform-dependent value for BUFSIZ. For more information about the BUFSIZ default value, see your Oracle operating system-specific documentation.
You can set RECORDLENGTH to any value equal to or greater than your system's BUFSIZ. (The highest value is 64 KB.) Changing the RECORDLENGTH parameter affects only the size of data that accumulates before writing to the database. It does not affect the operating system file block size.
You can also use this parameter to specify the size of the Import I/O buffer.
|
Note: See your Oracle operating system-specific documentation to determine the proper value or to create a file with a different record size. |
Default: n
The RESUMABLE parameter is used to enable and disable resumable space allocation. Because this parameter is disabled by default, you must set RESUMABLE=y in order to use its associated parameters, RESUMABLE_NAME and RESUMABLE_TIMEOUT.
See Also:
|
Default: 'User USERNAME (USERID), Session SESSIONID, Instance INSTANCEID'
The value for this parameter identifies the statement that is resumable. This value is a user-defined text string that is inserted in either the USER_RESUMABLE or DBA_RESUMABLE view to help you identify a specific resumable statement that has been suspended.
This parameter is ignored unless the RESUMABLE parameter is set to y to enable resumable space allocation.
Default: 7200 seconds (2 hours)
The value of the parameter specifies the time period during which an error must be fixed. If the error is not fixed within the timeout period, execution of the statement is aborted.
This parameter is ignored unless the RESUMABLE parameter is set to y to enable resumable space allocation.
Default: y
Specifies whether or not to import the rows of table data.
Default: n
When SHOW=y, the contents of the export file are listed to the display and not imported. The SQL statements contained in the export are displayed in the order in which Import will execute them.
The SHOW parameter can be used only with the FULL=y, FROMUSER, TOUSER, or TABLES parameter.
Default: n
Specifies whether or not Import skips building indexes that were set to the Index Unusable state (by either system or user). Other indexes (not previously set Index Unusable) continue to be updated as rows are inserted.
This parameter allows you to postpone index maintenance on selected index partitions until after row data has been inserted. You then have the responsibility to rebuild the affected index partitions after the Import.
|
Note: Indexes that are unique and marked Unusable are not allowed to skip index maintenance. Therefore, the |
You can use the INDEXFILE parameter in conjunction with INDEXES=n to provide the SQL scripts for re-creating the index. Without this parameter, row insertions that attempt to update unusable indexes will fail.
| See Also:
The |
Default: ALWAYS
Specifies what is done with the database optimizer statistics at import time.
The options are:
ALWAYS
Always import database optimizer statistics regardless of whether or not they are questionable.
NONE
Do not import or recalculate the database optimizer statistics.
SAFE
Import database optimizer statistics only if they are not questionable. If they are questionable, recalculate the optimizer statistics.
RECALCULATE
Do not import the database optimizer statistics. Instead, recalculate them on import.
See Also:
|
Default: y
Specifies whether or not to import any general streams metadata that may be present in the export dump file.
Default: n
Specifies whether or not to import streams instantiation metadata that may be present in the export dump file. Specify y if the import is part of an instantiation in a Streams environment.
Default: none
Specifies that the Import is a table-mode import and lists the table names and partition and subpartition names to import. Table-mode import lets you import entire partitioned or nonpartitioned tables. The TABLES parameter restricts the import to the specified tables and their associated objects, as listed in Table 1-1. You can specify the following values for the TABLES parameter:
tablename specifies the name of the table or tables to be imported. If a table in the list is partitioned and you do not specify a partition name, all its partitions and subpartitions are imported. To import all the exported tables, specify an asterisk (*) as the only table name parameter.
tablename can contain any number of '%' pattern matching characters, which can each match zero or more characters in the table names in the export file. All the tables whose names match all the specified patterns of a specific table name in the list are selected for import. A table name in the list that consists of all pattern matching characters and no partition name results in all exported tables being imported.
partition_name and subpartition_name let you restrict the import to one or more specified partitions or subpartitions within a partitioned table.The syntax you use to specify the preceding is in the form:
tablename:partition_nametablename:subpartition_name
If you use tablename:partition_name, the specified table must be partitioned, and partition_name must be the name of one of its partitions or subpartitions. If the specified table is not partitioned, the partition_name is ignored and the entire table is imported.
The number of tables that can be specified at the same time is dependent on command-line limits.
As the export file is processed, each table name in the export file is compared against each table name in the list, in the order in which the table names were specified in the parameter. To avoid ambiguity and excessive processing time, specific table names should appear at the beginning of the list, and more general table names (those with patterns) should appear at the end of the list.
Although you can qualify table names with schema names (as in scott.emp) when exporting, you cannot do so when importing. In the following example, the TABLES parameter is specified incorrectly:
imp SYSTEM/password TABLES=(jones.accts, scott.emp, scott.dept)
The valid specification to import these tables is as follows:
imp SYSTEM/passwordFROMUSER=jones TABLES=(accts) imp SYSTEM/passwordFROMUSER=scott TABLES=(emp,dept)
For a more detailed example, see Example Import of Using Pattern Matching to Import Various Tables.
The following restrictions apply to table names:
Some operating systems require that quotation marks on the command line be preceded by an escape character. The following are examples of how case-sensitivity can be preserved in the different Import modes.
For example, if the parameter file contains the following line, Import interprets everything on the line after emp# as a comment and does not import the tables dept and mydata:
TABLES=(emp#, dept, mydata)
However, given the following line, the Import utility exports all three tables because emp# is enclosed in quotation marks:
TABLES=("emp#", dept, mydata)
Default: none
When TRANSPORT_TABLESPACE is specified as y, use this parameter to provide a list of tablespaces to be transported into the database.
See TRANSPORT_TABLESPACE for more information.
Default: none
When you import a table that references a type, but a type of that name already exists in the database, Import attempts to verify that the preexisting type is, in fact, the type used by the table (rather than a different type that just happens to have the same name).
To do this, Import compares the type's unique identifier (TOID) with the identifier stored in the export file. Import will not import the table rows if the TOIDs do not match.
In some situations, you may not want this validation to occur on specified types (for example, if the types were created by a cartridge installation). You can use the TOID_NOVALIDATE parameter to specify types to exclude from TOID comparison.
The syntax is as follows:
TOID_NOVALIDATE=([schemaname.]typename [, ...])
For example:
imp scott/tiger TABLE=foo TOID_NOVALIDATE=bar
imp scott/tiger TABLE=foo TOID_NOVALIDATE=(fred.type0,sally.type2,type3)
If you do not specify a schema name for the type, it defaults to the schema of the importing user. For example, in the first preceding example, the type bar defaults to scott.bar.
The output of a typical import with excluded types would contain entries similar to the following:
[...]
. importing IMP3's objects into IMP3
. . skipping TOID validation on type IMP2.TOIDTYP0
. . importing table                  "TOIDTAB3"
[...]
Default: none
Specifies a list of usernames whose schemas will be targets for Import. The
IMP_FULL_DATABASE role is required to use this parameter. To import to a different schema than the one that originally contained the object, specify TOUSER. For example:
imp SYSTEM/password FROMUSER=scott TOUSER=joe TABLES=emp
If multiple schemas are specified, the schema names are paired. The following example imports scott's objects into joe's schema, and fred's objects into ted's schema:
imp SYSTEM/password FROMUSER=scott,fred TOUSER=joe,ted
If the FROMUSER list is longer than the TOUSER list, the remaining schemas will be imported into either the FROMUSER schema, or into the importer's schema, based on normal defaulting rules. You can use the following syntax to ensure that any extra objects go into the TOUSER schema:
imp SYSTEM/password FROMUSER=scott,adams TOUSER=ted,ted
Note that user ted is listed twice.
| See Also:
FROMUSER for information about restrictions when using |
Default: n
When specified as y, instructs Import to import transportable tablespace metadata from an export file.
Default: none
When TRANSPORT_TABLESPACE is specified as y, use this parameter to list the users who own the data in the transportable tablespace set.
See TRANSPORT_TABLESPACE.
Default: none
Specifies the username/password (and optional connect string) of the user performing the import.
USERID can also be:
username/password AS SYSDBA
or
username/password@instance
or
username/password@instanceAS SYSDBA
If you connect as user SYS, you must also specify AS SYSDBA in the connect string. Your operating system may require you to treat AS SYSDBA as a special string, in which case the entire string would be enclosed in quotation marks. See Invoking Import As SYSDBA for more information.
See Also:
|
Specifies the maximum number of bytes in an export file on each volume of tape.
The VOLSIZE parameter has a maximum value equal to the maximum value that can be stored in 64 bits. See your Oracle operating system-specific documentation for more information.
The VOLSIZE value can be specified as number followed by KB (number of kilobytes). For example, VOLSIZE=2KB is the same as VOLSIZE=2048. Similarly, MB specifies megabytes (1024 * 1024) and GB specifies gigabytes (1024**3). The shorthand for bytes remains B; the number is not multiplied to get the final file size (VOLSIZE=2048B is the same as VOLSIZE=2048).
This section gives some examples of import sessions that show you how to use the parameter file and command-line methods. The examples illustrate the following scenarios:
In this example, using a full database export file, an administrator imports the dept and emp tables into the scott schema.
> imp SYSTEM/password PARFILE=params.dat
The params.dat file contains the following information:
FILE=dba.dmp
SHOW=n
IGNORE=n
GRANTS=y
FROMUSER=scott
TABLES=(dept,emp)
> imp SYSTEM/password FILE=dba.dmp FROMUSER=scott TABLES=(dept,emp)
Import: Release 9.2.0.1.0 - Production on Wed Feb 27 17:20:51 2002

(c) Copyright 2002 Oracle Corporation.  All rights reserved.


Connected to: Oracle9i Enterprise Edition Release 9.2.0.1.0 - Production
With the Partitioning and Oracle Data Mining options
JServer Release 9.2.0.1.0 - Production

Export file created by EXPORT:V09.02.00 via conventional path
import done in WE8DEC character set and AL16UTF16 NCHAR character set
. importing SCOTT's objects into SCOTT
. . importing table                         "DEPT"          4 rows imported
. . importing table                          "EMP"         14 rows imported
Import terminated successfully without warnings.
This example illustrates importing the unit and manager tables from a file exported by blake into the scott schema.
> imp SYSTEM/password PARFILE=params.dat
The params.dat file contains the following information:
FILE=blake.dmp
SHOW=n
IGNORE=n
GRANTS=y
ROWS=y
FROMUSER=blake
TOUSER=scott
TABLES=(unit,manager)
> imp SYSTEM/password FROMUSER=blake TOUSER=scott FILE=blake.dmp -
TABLES=(unit,manager)
Import: Release 9.2.0.1.0 - Production on Wed Feb 27 17:21:40 2002

(c) Copyright 2002 Oracle Corporation.  All rights reserved.


Connected to: Oracle9i Enterprise Edition Release 9.2.0.1.0 - Production
With the Partitioning and Oracle Data Mining options
JServer Release 9.2.0.1.0 - Production

Export file created by EXPORT:V09.02.00 via conventional path

Warning: the objects were exported by BLAKE, not by you

import done in WE8DEC character set and AL16UTF16 NCHAR character set
. . importing table                         "UNIT"          4 rows imported
. . importing table                      "MANAGER"          4 rows imported
Import terminated successfully without warnings.
In this example, a DBA imports all tables belonging to scott into user blake's account.
> imp SYSTEM/password PARFILE=params.dat
The params.dat file contains the following information:
FILE=scott.dmp
FROMUSER=scott
TOUSER=blake
TABLES=(*)
> imp SYSTEM/password FILE=scott.dmp FROMUSER=scott TOUSER=blake TABLES=(*)
Import: Release 9.2.0.1.0 - Production on Wed Feb 27 17:21:44 2002

(c) Copyright 2002 Oracle Corporation.  All rights reserved.


Connected to: Oracle9i Enterprise Edition Release 9.2.0.1.0 - Production
With the Partitioning and Oracle Data Mining options
JServer Release 9.2.0.1.0 - Production

Export file created by EXPORT:V09.02.00 via conventional path

Warning: the objects were exported by SCOTT, not by you

import done in WE8DEC character set and AL16UTF16 NCHAR character set
. importing SCOTT's objects into BLAKE
. . importing table                        "BONUS"          0 rows imported
. . importing table                         "DEPT"          4 rows imported
. . importing table                          "EMP"         14 rows imported
. . importing table                     "SALGRADE"          5 rows imported
Import terminated successfully without warnings.
This section describes an import of a table with multiple partitions, a table with partitions and subpartitions, and repartitioning a table on different columns.
In this example, emp is a partitioned table with three partitions: p1, p2, and p3.
A table-level export file was created using the following command:
> exp scott/tiger TABLES=emp FILE=exmpexp.dat ROWS=y
Export: Release 9.2.0.1.0 - Production on Wed Feb 27 17:22:55 2002

(c) Copyright 2002 Oracle Corporation.  All rights reserved.


Connected to: Oracle9i Enterprise Edition Release 9.2.0.1.0 - Production
With the Partitioning and Oracle Data Mining options
JServer Release 9.2.0.1.0 - Production
Export done in WE8DEC character set and AL16UTF16 NCHAR character set

About to export specified tables via Conventional Path ...
. . exporting table                            EMP
. . exporting partition                             P1          7 rows exported
. . exporting partition                             P2         12 rows exported
. . exporting partition                             P3          3 rows exported
Export terminated successfully without warnings.
In a partition-level import you can specify the specific partitions of an exported table that you want to import. In this example, these are p1 and p3 of table emp:
> imp scott/tiger TABLES=(emp:p1,emp:p3) FILE=exmpexp.dat ROWS=y
Import: Release 9.2.0.1.0 - Production on Wed Feb 27 17:22:57 2002

(c) Copyright 2002 Oracle Corporation.  All rights reserved.


Connected to: Oracle9i Enterprise Edition Release 9.2.0.1.0 - Production
With the Partitioning and Oracle Data Mining options
JServer Release 9.2.0.1.0 - Production

Export file created by EXPORT:V09.02.00 via conventional path
import done in WE8DEC character set and AL16UTF16 NCHAR character set
. importing SCOTT's objects into SCOTT
. . importing partition                     "EMP":"P1"          7 rows imported
. . importing partition                     "EMP":"P3"          3 rows imported
Import terminated successfully without warnings.
This example demonstrates that the partitions and subpartitions of a composite partitioned table are imported. emp is a partitioned table with two composite partitions: p1 and p2. P1 has three subpartitions: p1_sp1, p1_sp2, and p1_sp3. P2 has two subpartitions: p2_sp1 and p2_sp2.
A table-level export file was created using the following command:
> exp scott/tiger TABLES=emp FILE=exmpexp.dat ROWS=y
Export: Release 9.2.0.1.0 - Production on Wed Feb 27 17:23:06 2002

(c) Copyright 2002 Oracle Corporation.  All rights reserved.


Connected to: Oracle9i Enterprise Edition Release 9.2.0.1.0 - Production
With the Partitioning and Oracle Data Mining options
JServer Release 9.2.0.1.0 - Production
Export done in WE8DEC character set and AL16UTF16 NCHAR character set

About to export specified tables via Conventional Path ...
. . exporting table                            EMP
. . exporting composite partition                   P1
. . exporting subpartition                      P1_SP1          2 rows exported
. . exporting subpartition                      P1_SP2         10 rows exported
. . exporting subpartition                      P1_SP3          7 rows exported
. . exporting composite partition                   P2
. . exporting subpartition                      P2_SP1          4 rows exported
. . exporting subpartition                      P2_SP2          2 rows exported
Export terminated successfully without warnings.
The following import command results in the importing of subpartition p1_sp2 and p1_sp3 of composite partition p1 in table emp and all subpartitions of composite partition p2 in table emp.
> imp scott/tiger TABLES=(emp:p1_sp2,emp:p1_sp3,emp:p2) FILE=exmpexp.dat ROWS=y
Import: Release 9.2.0.1.0 - Production on Wed Feb 27 17:23:07 2002

(c) Copyright 2002 Oracle Corporation.  All rights reserved.


Connected to: Oracle9i Enterprise Edition Release 9.2.0.1.0 - Production
With the Partitioning and Oracle Data Mining options
JServer Release 9.2.0.1.0 - Production

Export file created by EXPORT:V09.02.00 via conventional path
import done in WE8DEC character set and AL16UTF16 NCHAR character set
. importing SCOTT's objects into SCOTT
. . importing subpartition              "EMP":"P1_SP2"         10 rows imported
. . importing subpartition              "EMP":"P1_SP3"          7 rows imported
. . importing subpartition              "EMP":"P2_SP1"          4 rows imported
. . importing subpartition              "EMP":"P2_SP2"          2 rows imported
Import terminated successfully without warnings.
This example assumes the emp table has two partitions based on the empno column. This example repartitions the emp table on the deptno column.
Perform the following steps to repartition a table on a different column:
The following example illustrates these steps.
> exp scott/tiger table=emp file=empexp.dat

Export: Release 9.2.0.1.0 - Production on Wed Feb 27 17:22:19 2002

(c) Copyright 2002 Oracle Corporation.  All rights reserved.


Connected to: Oracle9i Enterprise Edition Release 9.2.0.1.0 - Production
With the Partitioning and Oracle Data Mining options
JServer Release 9.2.0.1.0 - Production
Export done in WE8DEC character set and AL16UTF16 NCHAR character set

About to export specified tables via Conventional Path ...
. . exporting table                            EMP
. . exporting partition                        EMP_LOW          4 rows exported
. . exporting partition                       EMP_HIGH         10 rows exported
Export terminated successfully without warnings.

SQL> connect scott/tiger
Connected.
SQL> drop table emp cascade constraints;
Statement processed.
SQL> create table emp
     2>    (
     3>    empno    number(4) not null,
     4>    ename    varchar2(10),
     5>    job      varchar2(9),
     6>    mgr      number(4),
     7>    hiredate date,
     8>    sal      number(7,2),
     9>    comm     number(7,2),
    10>    deptno   number(2)
    11>    )
    12> partition by range (deptno)
    13>   (
    14>   partition dept_low values less than (15)
    15>     tablespace tbs_1,
    16>   partition dept_mid values less than (25)
    17>     tablespace tbs_2,
    18>   partition dept_high values less than (35)
    19>     tablespace tbs_3
    20>   );
Statement processed.
SQL> exit

> imp scott/tiger tables=emp file=empexp.dat ignore=y

Import: Release 9.2.0.1.0 - Production on Wed Feb 27 17:22:25 2002

(c) Copyright 2002 Oracle Corporation.  All rights reserved.


Connected to: Oracle9i Enterprise Edition Release 9.2.0.1.0 - Production
With the Partitioning and Oracle Data Mining options
JServer Release 9.2.0.1.0 - Production

Export file created by EXPORT:V09.02.00 via conventional path
import done in WE8DEC character set and AL16UTF16 NCHAR character set
. importing SCOTT's objects into SCOTT
. . importing partition                "EMP":"EMP_LOW"          4 rows imported
. . importing partition               "EMP":"EMP_HIGH"         10 rows imported
Import terminated successfully without warnings.
The following SELECT statements show that the data is partitioned on the deptno column:
SQL> connect scott/tiger
Connected.
SQL> select empno, deptno from emp partition (dept_low);
EMPNO      DEPTNO
---------- ----------
      7782         10
      7839         10
      7934         10
3 rows selected.
SQL> select empno, deptno from emp partition (dept_mid);
EMPNO      DEPTNO
---------- ----------
      7369         20
      7566         20
      7788         20
      7876         20
      7902         20
5 rows selected.
SQL> select empno, deptno from emp partition (dept_high);
EMPNO      DEPTNO
---------- ----------
      7499         30
      7521         30
      7654         30
      7698         30
      7844         30
      7900         30
6 rows selected.
SQL> exit;
In this example, pattern matching is used to import various tables for user scott.
imp SYSTEM/password PARFILE=params.dat
The params.dat file contains the following information:
FILE=scott.dmp
IGNORE=n
GRANTS=y
ROWS=y
FROMUSER=scott
TABLES=(%d%,b%s)
imp SYSTEM/password FROMUSER=scott FILE=scott.dmp TABLES=(%d%,b%s)
Import: Release 9.2.0.1.0 - Production on Wed Feb 27 17:22:25 2002

(c) Copyright 2002 Oracle Corporation.  All rights reserved.


Connected to: Oracle9i Enterprise Edition Release 9.2.0.1.0 - Production
With the Partitioning and Oracle Data Mining options
JServer Release 9.2.0.1.0 - Production

Export file created by EXPORT:V09.02.00 via conventional path

import done in US7ASCII character set and AL16UTF16 NCHAR character set
import server uses JA16SJIS character set (possible charset conversion)
. importing SCOTT's objects into SCOTT
. . importing table                  "BONUS"          0 rows imported
. . importing table                   "DEPT"          4 rows imported
. . importing table               "SALGRADE"          5 rows imported
Import terminated successfully without warnings.
Starting Import from the command line with no parameters initiates the interactive method. The interactive method does not provide prompts for all Import functionality. The interactive method is provided only for backward compatibility.
If you do not specify a username/password combination on the command line, the Import utility prompts you for this information.
When you invoke Import interactively, the response given by Import depends on what you enter at the command line. Table 2-3 shows the possibilities.
In Import interactive mode, you are not prompted to specify whether you want to connect as SYSDBA or @instance. You must specify AS SYSDBA and/or @instance with the username.
Additionally, if you omit the password and allow Import to prompt you for it, you cannot specify the @instance string as well. You can specify @instance only with username.
Before you invoke Import using AS SYSDBA, be sure to read Invoking Import As SYSDBA for information about correct command-line syntax.
After Import is invoked, it displays the following prompts. You may not see all prompts in a given Import session because some prompts depend on your responses to other prompts. Some prompts show a default answer. If the default is acceptable, press Enter.
Import: Release 9.2.0.1.0 - Production on Wed Feb 27 17:22:37 2002

(c) Copyright 2002 Oracle Corporation.  All rights reserved.


Connected to: Oracle9i Enterprise Edition Release 9.2.0.1.0 - Production
With the Partitioning and Oracle Data Mining options
JServer Release 9.2.0.1.0 - Production

Import file: expdat.dmp >
Enter insert buffer size (minimum is 8192) 30720>
Export file created by EXPORT:V09.02.00 via conventional path

Warning: the objects were exported by BLAKE, not by you

import done in WE8DEC character set and AL16UTF16 NCHAR character set
List contents of import file only (yes/no): no >
Ignore create error due to object existence (yes/no): no >
Import grants (yes/no): yes >
Import table data (yes/no): yes >
Import entire export file (yes/no): no > y
. importing BLAKE's objects into SYSTEM
. . importing table                         "DEPT"          4 rows imported
. . importing table                      "MANAGER"          3 rows imported
Import terminated successfully without warnings.
If you specify No at the Import entire export file(yes/no): prompt, Import prompts you for a schema name and the table names you want to import for that schema, as follows:
Enter table(T) or partition(T:P) names. Null list means all tables for user
Entering a null table list causes all tables in the schema to be imported. You can specify only one schema at a time when you use the interactive method.
This section describes the different types of messages issued by Import and how to save them in a log file.
You can capture all Import messages in a log file, either by using the LOG parameter or, for those systems that permit it, by redirecting Import's output to a file. The Import utility writes a log of detailed information about successful loads and any errors that may occur.
See Also:
|
Import does not terminate after recoverable errors. For example, if an error occurs while importing a table, Import displays (or logs) an error message, skips to the next table, and continues processing. These recoverable errors are known as warnings.
Import also issues a warning whenever it encounters an invalid object.
For example, if a nonexistent table is specified as part of a table-mode import, the Import utility imports all other tables. Then it issues a warning and terminates successfully.
Some errors are nonrecoverable and terminate the Import session. These errors typically occur because of an internal problem or because a resource, such as memory, is not available or has been exhausted.
When an import completes without errors, Import displays the following message:
Import terminated successfully without warnings
If one or more recoverable errors occurs but Import is able to continue to completion, Import displays the following message:
Import terminated successfully with warnings
If a nonrecoverable error occurs, Import terminates immediately and displays the following message:
Import terminated unsuccessfully
| See Also:
Oracle9i Database Error Messages and your Oracle operating system-specific documentation |
Import provides the results of an import operation immediately upon completion. Depending on the platform, Import may report the outcome in a process exit code as well as recording the results in the log file. This enables you to check the outcome from the command line or script. Table 2-4 shows the exit codes that are returned for various results.
| Result | Exit Code |
|---|---|
|
Import terminated successfully without warnings |
|
|
Import terminated successfully with warnings |
|
|
Import terminated unsuccessfully |
|
For UNIX, the exit codes are as follows:
EX_SUCC   0
EX_OKWARN 0
EX_FAIL   1
This section describes errors that can occur when you import database objects.
If a row is rejected due to an integrity constraint violation or invalid data, Import displays a warning message but continues processing the rest of the table. Some errors, such as "tablespace full," apply to all subsequent rows in the table. These errors cause Import to stop processing the current table and skip to the next table.
A "tablespace full" error can suspend the import if the RESUMABLE=y parameter is specified.
A row error is generated if a row violates one of the integrity constraints in force on your system, including:
NOT NULL constraintsRow errors can also occur when the column definition for a table in a database is different from the column definition in the export file. The error is caused by data that is too long to fit into a new table's columns, by invalid datatypes, or by any other INSERT error.
Errors can occur for many reasons when you import database objects, as described in this section. When these errors occur, import of the current database object is discontinued. Import then attempts to continue with the next database object in the export file.
If a database object to be imported already exists in the database, an object creation error occurs. What happens next depends on the setting of the IGNORE parameter.
If IGNORE=n (the default), the error is reported, and Import continues with the next database object. The current database object is not replaced. For tables, this behavior means that rows contained in the export file are not imported.
If IGNORE=y, object creation errors are not reported. The database object is not replaced. If the object is a table, rows are imported into it. Note that only object creation errors are ignored; all other errors (such as operating system, database, and SQL errors) are reported and processing may stop.
If sequence numbers need to be reset to the value in an export file as part of an import, you should drop sequences. If a sequence is not dropped before the import, it is not set to the value captured in the export file, because Import does not drop and re-create a sequence that already exists. If the sequence already exists, the export file's CREATE SEQUENCE statement fails and the sequence is not imported.
Resource limitations can cause objects to be skipped. When you are importing tables, for example, resource errors can occur as a result of internal problems, or when a resource such as memory has been exhausted.
If a resource error occurs while you are importing a row, Import stops processing the current table and skips to the next table. If you have specified COMMIT=y, Import commits the partial import of the current table. If not, a rollback of the current table occurs before Import continues. See the description of COMMIT.
Domain indexes can have associated application-specific metadata that is imported using anonymous PL/SQL blocks. These PL/SQL blocks are executed at import time prior to the CREATE INDEX statement. If a PL/SQL block causes an error, the associated index is not created because the metadata is considered an integral part of the index.
You can import tables, partitions, and subpartitions in the following ways:
You must set the parameter IGNORE=y when loading data into an existing table. See IGNORE for more information.
For each specified table, table-level Import imports all rows of the table. With table-level Import:
TRANSPORT_TABLESPACES) can be imported.If the table does not exist, and if the exported table was partitioned, table-level Import creates a partitioned table. If the table creation is successful, table-level Import reads all source data from the export file into the target table. After Import, the target table contains the partition definitions of all partitions and subpartitions associated with the source table in the Export file. This operation ensures that the physical and logical attributes (including partition bounds) of the source partitions are maintained on Import.
Partition-level Import can only be specified in table mode. It lets you selectively load data from specified partitions or subpartitions in an export file. Keep the following guidelines in mind when using partition-level import.
ROWS=y (default), and the table does not exist in the Import target system, the table is created and all rows from the source partition or subpartition are inserted into the partition or subpartition of the target table.ROWS=y (default) and IGNORE=y, but the table already existed before Import, all rows for the specified partition or subpartition in the table are inserted into the table. The rows are stored according to the existing partitioning scheme of the target table.ROWS=n, Import does not insert data into the target table and continues to process other objects associated with the specified table and partition or subpartition in the file.IGNORE=y to import one or more partitions or subpartitions from the Export file into a nonpartitioned table on the import target system.If you specify a partition name for a composite partition, all subpartitions within the composite partition are used as the source.
In the following example, the partition specified by the partition-name is a composite partition. All of its subpartitions will be imported:
imp SYSTEM/password FILE=expdat.dmp FROMUSER=scott TABLES=b:py
The following example causes row data of partitions qc and qd of table scott.e to be imported into the table scott.e:
imp scott/tiger FILE=expdat.dmp TABLES=(e:qc, e:qd) IGNORE=y
If table e does not exist in the Import target database, it is created and data is inserted into the same partitions. If table e existed on the target system before Import, the row data is inserted into the partitions whose range allows insertion. The row data can end up in partitions of names other than qc and qd.
|
Note: With partition-level Import to an existing table, you must set up the target partitions or subpartitions properly and use |
This section describes the behavior of Import with respect to index creation and maintenance.
Import provides you with the capability of delaying index creation and maintenance services until after completion of the import and insertion of exported data. Performing index creation, re-creation, or maintenance after Import completes is generally faster than updating the indexes for each row inserted by Import.
Index creation can be time consuming, and therefore can be done more efficiently after the import of all other objects has completed. You can postpone creation of indexes until after the Import completes by specifying INDEXES=n. (INDEXES=y is the default.) You can then store the missing index definitions in a SQL script by running Import while using the INDEXFILE parameter. The index-creation statements that would otherwise be issued by Import are instead stored in the specified file.
After the import is complete, you must create the indexes, typically by using the contents of the file (specified with INDEXFILE) as a SQL script after specifying passwords for the connect statements.
If SKIP_UNUSABLE_INDEXES=y, the Import utility postpones maintenance on all indexes that were set to Index Unusable before Import. Other indexes (not previously set Index Unusable) continue to be updated as rows are inserted. This approach saves on index updates during import of existing tables.
Delayed index maintenance may cause a violation of an existing unique integrity constraint supported by the index. The existence of a unique integrity constraint on a table does not prevent existence of duplicate keys in a table that was imported with INDEXES=n. The supporting index will be in an UNUSABLE state until the duplicates are removed and the index is rebuilt.
For example, assume that partitioned table t with partitions p1 and p2 exists on the Import target system. Assume that local indexes p1_ind on partition p1 and p2_ind on partition p2 exist also. Assume that partition p1 contains a much larger amount of data in the existing table t, compared with the amount of data to be inserted by the Export file (expdat.dmp). Assume that the reverse is true for p2.
Consequently, performing index updates for p1_ind during table data insertion time is more efficient than at partition index rebuild time. The opposite is true for p2_ind.
Users can postpone local index maintenance for p2_ind during Import by using the following steps:
ALTER TABLE t MODIFY PARTITION p2 UNUSABLE LOCAL INDEXES;
imp scott/tiger FILE=expdat.dmp TABLES = (t:p1, t:p2) IGNORE=y SKIP_UNUSABLE_INDEXES=y
This example executes the ALTER SESSION SET SKIP_UNUSABLE_INDEXES=y statement before performing the import.
ALTER TABLE t MODIFY PARTITION p2 REBUILD UNUSABLE LOCAL INDEXES;
In this example, local index p1_ind on p1 will be updated when table data is inserted into partition p1 during Import. Local index p2_ind on p2 will be updated at index rebuild time, after Import.
A database with many noncontiguous, small blocks of free space is said to be fragmented. A fragmented database should be reorganized to make space available in contiguous, larger blocks. You can reduce fragmentation by performing a full database export and import as follows:
FULL=y) to back up the entire database.CREATE DATABASE statement.FULL=y) to restore the entire database.
| See Also:
Oracle9i Database Administrator's Guide for more information about creating databases |
This section describes factors to take into account when using Export and Import across a network.
Because the export file is in binary format, use a protocol that supports binary transfers to prevent corruption of the file when you transfer it across a network. For example, use FTP or a similar file transfer protocol to transmit the file in binary mode. Transmitting export files in character mode causes errors when the file is imported.
With Oracle Net, you can perform exports and imports over a network. For example, if you run Export locally, you can write data from a remote Oracle database into a local export file. If you run Import locally, you can read data into a remote Oracle database.
To use Import with Oracle Net, include the connection qualifier string @connect_string when entering the username/password in the exp or imp command. For the exact syntax of this clause, see the user's guide for your Oracle Net protocol.
This section describes the character set conversions that can take place during export and import operations.
The following sections describe character conversion as it applies to user data and DDL.
Data of datatypes CHAR, VARCHAR2, NCHAR, NVARCHAR2, CLOB, and NCLOB are written to the export file directly in the character sets of the source database. If the character sets of the source database are different than the character sets of the import database, a single conversion is performed.
Up to three character set conversions may be required for DDL during an export/import operation:
NLS_LANG environment variable for the user session. A character set conversion is performed if the value of NLS_LANG differs from the database character set.To minimize data loss due to character set conversions, ensure that the export database, the export user session, the import user session, and the import database all use the same character set.
Some 8-bit characters can be lost (that is, converted to 7-bit equivalents) when you import an 8-bit character set export file. This occurs if the system on which the import occurs has a native 7-bit character set, or the NLS_LANG operating system environment variable is set to a 7-bit character set. Most often, this is apparent when accented characters lose the accent mark.
To avoid this unwanted conversion, you can set the NLS_LANG operating system environment variable to be that of the export file character set.
When importing an Oracle version 5 or 6 export file with a character set different from that of the native operating system or the setting for NLS_LANG, you must set the CHARSET import parameter to specify the character set of the export file.
During character set conversion, any characters in the export file that have no equivalent in the target character set are replaced with a default character. (The default character is defined by the target character set.) To guarantee 100% conversion, the target character set must be a superset (or equivalent) of the source character set.
The following sections describe points you should consider when you import particular database objects.
The Oracle database server assigns object identifiers to uniquely identify object types, object tables, and rows in object tables. These object identifiers are preserved by Import.
When you import a table that references a type, but a type of that name already exists in the database, Import attempts to verify that the preexisting type is, in fact, the type used by the table (rather than a different type that just happens to have the same name).
To do this, Import compares the types's unique identifier (TOID) with the identifier stored in the export file. If those match, Import then compares the type's unique hashcode with that stored in the export file. Import will not import table rows if the TOIDs or hashcodes do not match.
In some situations, you may not want this validation to occur on specified types (for example, if the types were created by a cartridge installation). You can use the parameter TOID_NOVALIDATE to specify types to exclude from the TOID and hashcode comparison. See TOID_NOVALIDATE for more information.
Import uses the following criteria to decide how to handle object types, object tables, and rows in object tables:
IGNORE=y, the object type already exists, and the object identifiers, hashcodes, and type descriptors match, no error is reported. If the object identifiers or hashcodes do not match and the parameter TOID_NOVALIDATE has not been set to ignore the object type, an error is reported and any tables using the object type are not imported.IGNORE=n and the object type already exists, an error is reported. If the object identifiers, hashcodes, or type descriptors do not match and the parameter TOID_NOVALIDATE has not been set to ignore the object type, any tables using the object type are not imported.IGNORE=y, the table already exists, and the object identifiers, hashcodes, and type descriptors match, no error is reported. Rows are imported into the object table. Import of rows may fail if rows with the same object identifier already exist in the object table. If the object identifiers, hashcodes, or type descriptors do not match, and the parameter TOID_NOVALIDATE has not been set to ignore the object type, an error is reported and the table is not imported.IGNORE=n and the table already exists, an error is reported and the table is not imported.Because Import preserves object identifiers of object types and object tables, consider the following when you import objects from one schema into another schema using the FROMUSER and TOUSER parameters:
FROMUSER object types and object tables already exist on the target system, errors occur because the object identifiers of the TOUSER object types and object tables are already in use. The FROMUSER object types and object tables must be dropped from the system before the import is started.OID AS option to assign it the same object identifier as another table, both tables cannot be imported. You can import one of the tables, but the second table receives an error because the object identifier is already in use.Users frequently create tables before importing data to reorganize tablespace usage or to change a table's storage parameters. The tables must be created with the same definitions as were previously used or a compatible format (except for storage parameters). For object tables and tables that contain columns of object types, format compatibilities are more restrictive.
For object tables and for tables containing columns of objects, each object the table references has its name, structure, and version information written out to the Export file. Export also includes object type information from different schemas, as needed.
Import verifies the existence of each object type required by a table prior to importing the table data. This verification consists of a check of the object type's name followed by a comparison of the object type's structure and version from the import system with that found in the Export file.
If an object type name is found on the import system, but the structure or version do not match that from the Export file, an error message is generated and the table data is not imported.
The Import parameter TOID_NOVALIDATE can be used to disable the verification of the object type's structure and version for specific objects.
Inner nested tables are exported separately from the outer table. Therefore, situations may arise where data in an inner nested table might not be properly imported:
IGNORE=y parameter is used, there will be a constraint violation when inserting each row in the outer table. However, data in the inner nested table may be successfully imported, resulting in duplicate rows in the inner table.You should always carefully examine the log file for errors in outer tables and inner tables. To be consistent, table data may need to be modified or deleted.
Because inner nested tables are imported separately from the outer table, attempts to access data from them while importing may produce unexpected results. For example, if an outer row is accessed before its inner rows are imported, an incomplete row may be returned to the user.
REF columns and attributes may contain a hidden ROWID that points to the referenced type instance. Import does not automatically recompute these ROWIDs for the target database. You should execute the following statement to reset the
ROWIDs to their proper values:
ANALYZE TABLE [schema.]table VALIDATE REF UPDATE;
| See Also:
Oracle9i SQL Reference for more information about the |
Export and Import do not copy data referenced by BFILE columns and attributes from the source database to the target database. Export and Import only propagate the names of the files and the directory aliases referenced by the BFILE columns. It is the responsibility of the DBA or user to move the actual files referenced through BFILE columns and attributes.
When you import table data that contains BFILE columns, the BFILE locator is imported with the directory alias and filename that was present at export time. Import does not verify that the directory alias or file exists. If the directory alias or file does not exist, an error occurs when the user accesses the BFILE data.
For directory aliases, if the operating system directory syntax used in the export system is not valid on the import system, no error is reported at import time. Subsequent access to the file data receives an error.
It is the responsibility of the DBA or user to ensure the directory alias is valid on the import system.
Import does not verify that the location referenced by the foreign function library is correct. If the formats for directory and filenames used in the library's specification on the export file are invalid on the import system, no error is reported at import time. Subsequent usage of the callout functions will receive an error.
It is the responsibility of the DBA or user to manually move the library and ensure the library's specification is valid on the import system.
The behavior of Import when a local stored procedure, function, or package is imported depends upon whether the COMPILE parameter is set to y or to n.
When a local stored procedure, function, or package is imported and COMPILE=y, the procedure, function, or package is recompiled upon import and retains its original timestamp specification. If the compilation is successful, it can be accessed by remote procedures without error.
If COMPILE=n, the procedure, function, or package is still imported, but the original timestamp is lost. The compilation takes place the next time the procedure, function, or package is used.
When you import Java objects into any schema, the Import utility leaves the resolver unchanged. (The resolver is the list of schemas used to resolve Java full names.) This means that after an import, all user classes are left in an invalid state until they are either implicitly or explicitly revalidated. An implicit revalidation occurs the first time the classes are referenced. An explicit revalidation occurs when the SQL statement ALTER JAVA CLASS...RESOLVE is used. Both methods result in the user classes being resolved successfully and becoming valid.
Import does not verify that the location referenced by the external table is correct. If the formats for directory and filenames used in the table's specification on the export file are invalid on the import system, no error is reported at import time. Subsequent usage of the callout functions will receive an error.
It is the responsibility of the DBA or user to manually move the table and ensure the table's specification is valid on the import system.
Importing a queue table also imports any underlying queues and the related dictionary information. A queue can be imported only at the granularity level of the queue table. When a queue table is imported, export pretable and posttable action procedures maintain the queue dictionary.
LONG columns can be up to 2 gigabytes in length. In importing and exporting, the LONG columns must fit into memory with the rest of each row's data. The memory used to store LONG columns, however, does not need to be contiguous, because LONG data is loaded in sections.
Import can be used to convert LONG columns to CLOB columns. To do this, first create a table specifying the new CLOB column. When Import is run, the LONG data is converted to CLOB format. The same technique can be used to convert LONG RAW columns to BLOB columns.
Views are exported in dependency order. In some cases, Export must determine the ordering, rather than obtaining the order from the server database. In doing so, Export may not always be able to duplicate the correct ordering, resulting in compilation warnings when a view is imported, and the failure to import column comments on such views.
In particular, if viewa uses the stored procedure procb, and procb uses the view viewc, Export cannot determine the proper ordering of viewa and viewc. If viewa is exported before viewc and procb already exists on the import system, viewa receives compilation warnings at import time.
Grants on views are imported even if a view has compilation errors. A view could have compilation errors if an object it depends on, such as a table, procedure, or another view, does not exist when the view is created. If a base table does not exist, the server cannot validate that the grantor has the proper privileges on the base table with the GRANT OPTION. Access violations could occur when the view is used if the grantor does not have the proper privileges after the missing tables are created.
Importing views that contain references to tables in other schemas requires that the importer have SELECT ANY TABLE privilege. If the importer has not been granted this privilege, the views will be imported in an uncompiled state. Note that granting the privilege to a role is insufficient. For the view to be compiled, the privilege must be granted directly to the importer.
Import attempts to create a partitioned table with the same partition or subpartition names as the exported partitioned table, including names of the form SYS_Pnnn. If a table with the same name already exists, Import processing depends on the value of the IGNORE parameter.
Unless SKIP_UNUSABLE_INDEXES=y, inserting the exported data into the target table fails if Import cannot update a nonpartitioned index or index partition that is marked Indexes Unusable or is otherwise not suitable.
You can export tables with fine-grained access control policies enabled. When doing so, keep the following considerations in mind:
To restore the fine-grained access control policies, the user who imports from an export file containing such tables must have the following privileges:
EXECUTE privilege on the DBMS_RLS package so that the tables' security policies can be reinstated.EXPORT_FULL_DATABASE role enabled or EXEMPT ACCESS POLICY grantedIf a user without the correct privileges attempts to import from an export file that contains tables with fine-grained access control policies, a warning message will be issued. Therefore, it is advisable for security reasons that the exporter and importer of such tables be the DBA.
| See Also:
Oracle9i Application Developer's Guide - Fundamentals for more information about fine-grained access control |
|
Note: In certain situations, particularly those involving data warehousing, snapshots may be referred to as materialized views. This section retains the term snapshot. |
The three interrelated objects in a snapshot system are the master table, optional snapshot log, and the snapshot itself. The tables (master table, snapshot log table definition, and snapshot tables) can be exported independently of one another. Snapshot logs can be exported only if you export the associated master table. You can export snapshots using full database or user-mode Export; you cannot use table-mode Export.
This section discusses how fast refreshes are affected when these objects are imported.
| See Also:
Oracle9i Replication for Import-specific information about migration and compatibility and for more information about snapshots and snapshot logs |
The snapshot log in a dump file is imported if the master table already exists for the database to which you are importing and it has a snapshot log.
When a ROWID snapshot log is exported, ROWIDs stored in the snapshot log have no meaning upon import. As a result, each ROWID snapshot's first attempt to do a fast refresh fails, generating an error indicating that a complete refresh is required.
To avoid the refresh error, do a complete refresh after importing a ROWID snapshot log. After you have done a complete refresh, subsequent fast refreshes will work properly. In contrast, when a primary key snapshot log is exported, the values of the primary keys do retain their meaning upon Import. Therefore, primary key snapshots can do a fast refresh after the import.
| See Also:
Oracle9i Replication for information about primary key snapshots |
A snapshot that has been restored from an export file has reverted to a previous state. On import, the time of the last refresh is imported as part of the snapshot table definition. The function that calculates the next refresh time is also imported.
Each refresh leaves a signature. A fast refresh uses the log entries that date from the time of that signature to bring the snapshot up to date. When the fast refresh is complete, the signature is deleted and a new signature is created. Any log entries that are not needed to refresh other snapshots are also deleted (all log entries with times before the earliest remaining signature).
When you restore a snapshot from an export file, you may encounter a problem under certain circumstances.
Assume that a snapshot is refreshed at time A, exported at time B, and refreshed again at time C. Then, because of corruption or other problems, the snapshot needs to be restored by dropping the snapshot and importing it again. The newly imported version has the last refresh time recorded as time A. However, log entries needed for a fast refresh may no longer exist. If the log entries do exist (because they are needed for another snapshot that has yet to be refreshed), they are used, and the fast refresh completes successfully. Otherwise, the fast refresh fails, generating an error that says a complete refresh is required.
Snapshots, snapshot logs, and related items are exported with the schema name explicitly given in the DDL statements; therefore, snapshots and their related items cannot be imported into a different schema.
If you attempt to use FROMUSER and TOUSER to import snapshot data, an error will be written to the Import log file and the items will not be imported.
Transportable tablespaces let you move a set of tablespaces from one Oracle database to another.
To do this, you must make the tablespaces read-only, copy the datafiles of these tablespaces, and use Export and Import to move the database information (metadata) stored in the data dictionary. Both the datafiles and the metadata export file must be copied to the target database. The transport of these files can be done using any facility for copying flat binary files, such as the operating system copying facility, binary-mode FTP, or publishing on CD-ROMs.
After copying the datafiles and importing the metadata, you can optionally put the tablespaces in read/write mode.
See Transportable Tablespaces for information on creating an Export file containing transportable tablespace metadata.
Import provides the following parameters to enable import of transportable tablespaces metadata.
See TRANSPORT_TABLESPACE, TABLESPACES, DATAFILES, and TTS_OWNERS for more information.
See Also:
|
By default, a table is imported into its original tablespace.
If the tablespace no longer exists, or the user does not have sufficient quota in the tablespace, the system uses the default tablespace for that user, unless the table:
LOB, VARRAY, or OPAQUE type columnsIf the user does not have sufficient quota in the default tablespace, the user's tables are not imported. See Reorganizing Tablespaces to see how you can use this to your advantage.
The storage parameter OPTIMAL for rollback segments is not preserved during export and import.
Tables are exported with their current storage parameters. For object tables, the OIDINDEX is created with its current storage parameters and name, if given. For tables that contain LOB, VARRAY, or OPAQUE type columns, LOB, VARRAY, or OPAQUE type data is created with their current storage parameters.
If you alter the storage parameters of existing tables prior to export, the tables are exported using those altered storage parameters. Note, however, that storage parameters for LOB data cannot be altered prior to export (for example, chunk size for a LOB column, whether a LOB column is CACHE or NOCACHE, and so forth).
Note that LOB data might not reside in the same tablespace as the containing table. The tablespace for that data must be read/write at the time of import or the table will not be imported.
If LOB data resides in a tablespace that does not exist at the time of import or the user does not have the necessary quota in that tablespace, the table will not be imported. Because there can be multiple tablespace clauses, including one for the table, Import cannot determine which tablespace clause caused the error.
Before using the Import utility to import data, you may want to create large tables with different storage parameters. If so, you must specify IGNORE=y on the command line or in the parameter file.
By default at export time, storage parameters are adjusted to consolidate all data into its initial extent. To preserve the original size of an initial extent, you must specify at export time that extents are not to be consolidated (by setting COMPRESS=n). See COMPRESS.
Read-only tablespaces can be exported. On import, if the tablespace does not already exist in the target database, the tablespace is created as a read/write tablespace. If you want read-only functionality, you must manually make the tablespace read-only after the import.
If the tablespace already exists in the target database and is read-only, you must make it read/write before the import.
You can drop a tablespace by redefining the objects to use different tablespaces before the import. You can then issue the imp command and specify IGNORE=y.
In many cases, you can drop a tablespace by doing a full database export, then creating a zero-block tablespace with the same name (before logging off) as the tablespace you want to drop. During import, with IGNORE=y, the relevant CREATE TABLESPACE statement will fail and prevent the creation of the unwanted tablespace.
All objects from that tablespace will be imported into their owner's default tablespace with the exception of partitioned tables, type tables, and tables that contain LOB or VARRAY columns or index-only tables with overflow segments. Import cannot determine which tablespace caused the error. Instead, you must first create a table and then import the table again, specifying IGNORE=y.
Objects are not imported into the default tablespace if the tablespace does not exist or you do not have the necessary quotas for your default tablespace.
If a user's quota allows it, the user's tables are imported into the same tablespace from which they were exported. However, if the tablespace no longer exists or the user does not have the necessary quota, the system uses the default tablespace for that user as long as the table is unpartitioned, contains no LOB or VARRAY columns, is not a type table, and is not an index-only table with an overflow segment. This scenario can be used to move a user's tables from one tablespace to another.
For example, you need to move joe's tables from tablespace A to tablespace B after a full database export. Follow these steps:
joe has the UNLIMITED TABLESPACE privilege, revoke it. Set joe's quota on tablespace A to zero. Also revoke all roles that might have such privileges or quotas.
Role revokes do not cascade. Therefore, users who were granted other roles by joe will be unaffected.
joe's tables.joe's tables from tablespace A.joe a quota on tablespace B and make it the default tablespace for joe.joe's tables. (By default, Import puts joe's tables intoB.)If statistics are requested at export time and analyzer statistics are available for a table, Export will place the ANALYZE statement to recalculate the statistics for the table into the dump file. In most circumstances, Export will also write the precalculated optimizer statistics for tables, indexes, and columns to the dump file. See the description of the Export parameter STATISTICS and the Import parameter STATISTICS.
Because of the time it takes to perform an ANALYZE statement, it is usually preferable for Import to use the precalculated optimizer statistics for a table (and its indexes and columns) rather than executing the ANALYZE statement saved by Export. By default, Import will always use the precalculated statistics that are found in the export dump file.
The Export utility flags certain precalculated statistics as questionable. See the Export parameter, STATISTICS for more information. In certain situations, the importer might want to import only unquestionable statistics, and may not want to import precalculated statistics in the following situations:
In certain situations, the importer might want to always use ANALYZE statements rather than precalculated statistics. For example, the statistics gathered from a fragmented database may not be relevant when the data is imported in a compressed form. In these cases, the importer should specify STATISTICS=RECALCULATE to force the recalculation of statistics.
If you do not want any statistics to be established by Import, you should specify STATISTICS=NONE.
When you use the Export and Import utilities to migrate a large database, it may be more efficient to partition the migration into multiple export and import jobs. If you decide to partition the migration, be aware of the following advantages and disadvantages.
Partitioning a migration has the following advantages:
Partitioning a migration has the following disadvantages:
To perform a database migration in a partitioned manner, take the following steps:
All exports can be done in parallel. When the import of full.dmp completes, all remaining imports can also be done in parallel.
The following sections describe considerations when you import data from earlier versions of the Oracle database server into an Oracle9i server.
This section describes guidelines and restrictions that apply when you import data from an Oracle version 7 database into an Oracle9i server.
In Oracle9i, check constraints on DATE columns must use the TO_DATE function to specify the format of the date. Because this function was not required in versions prior to Oracle8i, data imported from an earlier Oracle database might not have used the TO_DATE function. In such cases, the constraints are imported into the Oracle9i database, but they are flagged in the dictionary as invalid.
The catalog views DBA_CONSTRAINTS, USER_CONSTRAINTS, and ALL_CONSTRAINTS can be used to identify such constraints. Import issues a warning message if invalid date constraints are in the database.
This section describes guidelines and restrictions that apply when you import data from an Oracle version 6 database into an Oracle9i server.
When user definitions are imported into an Oracle database, they are created with the CREATE USER statement. So, when importing from export files created by previous versions of Export, users are not granted CREATE SESSION privileges automatically.
Oracle version 6 CHAR columns are automatically converted into the Oracle VARCHAR2 datatype.
NOT NULL constraints are imported as ENABLED. All other constraints are imported as DISABLED.
A table with a default column value that is longer than the maximum size of that column generates the following error on import to Oracle9i:
ORA-1401: inserted value too large for column
Oracle version 6 did not check the columns in a CREATE TABLE statement to be sure they were long enough to hold their default values so these tables could be imported into a version 6 database. The Oracle9i server does make this check, however. As a result, column defaults that could be imported into a version 6 database may not import into Oracle9i.
If the default is a value returned by a function, the column must be large enough to hold the maximum value that can be returned by that function. Otherwise, the CREATE TABLE statement recorded in the export file produces an error on import.
Oracle9i Import reads Export dump files created by Oracle release 5.1.22 and higher. Keep in mind the following:
CHAR columns are automatically converted to VARCHAR2.NOT NULL constraints are imported as ENABLED.The following restrictions apply when you are using different releases of Export and Import:
Default: none
This parameter applies to Oracle version 5 and 6 export files only. Use of this parameter is not recommended. It is provided only for compatibility with previous versions. Eventually, it will no longer be supported.
Oracle version 5 and 6 export files do not contain the database character set identifier. However, a version 5 or 6 export file does indicate whether the user session character set was ASCII or EBCDIC.
Use this parameter to indicate the actual character set used at export time. The Import utility will verify whether the specified character set is ASCII or EBCDIC based on the character set in the export file.
If you do not specify a value for the CHARSET parameter and the export file is ASCII, Import will verify that the user session character set is ASCII. Or, if the export file is EBCDIC, Import will verify that the user session character set is EBCDIC.
If you are using a version of Oracle greater than version 5 or 6, the character set is specified within the export file, and conversion to the current database's character set is automatic. Specification of this parameter serves only as a check to ensure that the export file's character set matches the expected value. If not, an error results.
|
 Copyright © 1996, 2002 Oracle Corporation. All Rights Reserved. |
|

