Release 2 (9.2)
Part Number A96568-01
 Home |
 Book List |
 Contents |
 Index |
 Master Index |
 Feedback |
| Oracle9i Replication Management API Reference Release 2 (9.2) Part Number A96568-01 |
|
This chapter illustrates how to set up both a master site and a materialized view replication site using the replication management API.
This chapter contains these topics:
Before you build your replication environment, you need to set up the sites that will participate in the replication environment. As illustrated in Figure 2-2 and Figure 2-3, there are separate processes for setting up a master site versus setting up a materialized view site.
The examples in this chapter, and in other chapters, use the following nine databases:
Chapters 2 - 6 work with the replication environment illustrated in Figure 2-1. You start to create this environment using the instructions in this chapter. Notice that mv2.world is a materialized view based on the mv1.world materialized view, creating a multitier materialized view environment. The arrows in Figure 2-1 represent database links.

Follow the procedures identified in Figure 2-2 when you build a new master site or in Figure 2-3 when you build a new materialized view site.

The following sections contain step-by-step instructions for setting up the three master sites in our sample replication environment: orc1.world, orc2.world, and orc3.world.
/************************* BEGINNING OF SCRIPT ******************************
Complete the following steps to set up the orc1.world master site.
SYSTEM at a master site at orc1.world.Connect as SYSTEM to the database that you want to set up for replication. After you set up orc1.world, begin again with Step 1 for site orc2.world and Step 1 for site orc3.world.
*/

SET ECHO ON

SPOOL setup_masters.out

CONNECT SYSTEM/MANAGER@orc1.world

/*
The replication administrator must be granted the necessary privileges to create and manage a replication environment. The replication administrator must be created at each database that participates in the replication environment.
*/

CREATE USER repadmin IDENTIFIED BY repadmin;

/*
GRANT_ADMIN_ANY_SCHEMA procedure to grant the replication administrator powerful privileges to create and manage a replicated environment.
*/

BEGIN
   DBMS_REPCAT_ADMIN.GRANT_ADMIN_ANY_SCHEMA (
      username => 'repadmin');
END;
/

/*
repadmin to be able to create materialized view logs for any replicated table, then grant COMMENT ANY TABLE and LOCK ANY TABLE to repadmin:
*/

GRANT COMMENT ANY TABLE TO repadmin;
GRANT LOCK ANY TABLE TO repadmin;

/*
repadmin to be able to connect to the Replication Management tool, then grant SELECT ANY DICTIONARY to repadmin:
*/

GRANT SELECT ANY DICTIONARY TO repadmin;

/*
orc1.world.The propagator is responsible for propagating the deferred transaction queue to other master sites.
*/

BEGIN
   DBMS_DEFER_SYS.REGISTER_PROPAGATOR (
      username => 'repadmin');
END;
/

/*
orc1.world.The receiver receives the propagated deferred transactions sent by the propagator from other master sites.
*/

BEGIN
   DBMS_REPCAT_ADMIN.REGISTER_USER_REPGROUP (
      username => 'repadmin',
      privilege_type => 'receiver',
      list_of_gnames => NULL);
END;
/

/*
orc1.world.In order to keep the size of the deferred transaction queue in check, you should purge successfully completed deferred transactions. The SCHEDULE_PURGE procedure automates the purge process for you. You must execute this procedure as the replication administrator.
*/

CONNECT repadmin/repadmin@orc1.world

BEGIN
   DBMS_DEFER_SYS.SCHEDULE_PURGE (
      next_date => SYSDATE,
      interval => 'SYSDATE + 1/24',
      delay_seconds => 0);
END;
/

/*
| See Also:
Oracle9i Database Administrator's Guide and Oracle9i SQL Reference for more information about date expressions |
orc1.world that correspond to users at the materialized view site by completing the following steps:The proxy materialized view administrator performs tasks at the target master site on behalf of the materialized view administrator at the materialized view site.
*/

CONNECT SYSTEM/MANAGER@orc1.world

CREATE USER proxy_mviewadmin IDENTIFIED BY proxy_mviewadmin;

BEGIN
   DBMS_REPCAT_ADMIN.REGISTER_USER_REPGROUP (
      username => 'proxy_mviewadmin',
      privilege_type => 'proxy_snapadmin',
      list_of_gnames => NULL);
END;
/

-- Place GRANT SELECT_CATALOG_ROLE statement here if necessary.

/*
If you want your materialized view administrator at materialized view sites to be able to perform administrative operations using the Replication Management tool, then grant SELECT_CATALOG_ROLE to proxy_mviewadmin:
GRANT SELECT_CATALOG_ROLE TO proxy_mviewadmin;
Granting this privilege to the proxy_mviewadmin is not required if you do not plan to use the Replication Management tool. However, if you plan to use the Replication Management tool, then move the GRANT statement to the line directly after the previous REGISTER_USER_REPGROUP statement.
The proxy refresher performs tasks at the master site on behalf of the refresher at the materialized view site.
*/

CREATE USER proxy_refresher IDENTIFIED BY proxy_refresher;

GRANT CREATE SESSION TO proxy_refresher;
GRANT SELECT ANY TABLE TO proxy_refresher;

/*
Complete the following steps to set up the orc2.world master site.
SYSTEM at orc2.world.|
Note: Multiple master sites (multimaster replication) can only be used with Oracle Enterprise Edition. If you are not using Oracle Enterprise Edition, then skip to "Setting Up Materialized View Sites". |
You must connect as SYSTEM to the database that you want to set up for replication. After you set up orc2.world, begin with Step 1 for site orc3.world.
*/

connect SYSTEM/MANAGER@orc2.world

/*
orc2.world.The replication administrator must be granted the necessary privileges to create and manage a replication environment. The replication administrator must be created at each database that participates in the replication environment.
*/

create user REPADMIN identified by REPADMIN;

/*
orc2.world by completing the following steps:GRANT_ADMIN_ANY_SCHEMA procedure to grant the replication administrator powerful privileges to create and manage a replicated environment.
*/

BEGIN
   DBMS_REPCAT_ADMIN.GRANT_ADMIN_ANY_SCHEMA (
      username => 'repadmin');
END;
/

/*
repadmin to be able to create materialized view logs for any replicated table, then grant COMMENT ANY TABLE and LOCK ANY TABLE privileges to repadmin:
*/

GRANT COMMENT ANY TABLE TO repadmin;
GRANT LOCK ANY TABLE TO repadmin;

/*
repadmin to be able to connect to the Replication Management tool, then grant SELECT ANY DICTIONARY to repadmin:
*/

GRANT SELECT ANY DICTIONARY TO repadmin;

/*
orc2.world.The propagator is responsible for propagating the deferred transaction queue to other master sites.
*/

BEGIN
   DBMS_DEFER_SYS.REGISTER_PROPAGATOR (
      username => 'repadmin');
END;
/

/*
orc2.world.The receiver receives the propagated deferred transactions sent by the propagator from the other master sites.
*/

BEGIN
   DBMS_REPCAT_ADMIN.REGISTER_USER_REPGROUP (
      username => 'repadmin',
      privilege_type => 'receiver',
      list_of_gnames => NULL);
END;
/

/*
orc2.world.In order to keep the size of the deferred transaction queue in check, you should purge successfully completed deferred transactions. The SCHEDULE_PURGE procedure automates the purge process for you. You must execute this procedure as the replication administrator.
*/

CONNECT repadmin/repadmin@orc2.world

BEGIN
   DBMS_DEFER_SYS.SCHEDULE_PURGE (
      next_date => SYSDATE,
      interval => 'SYSDATE + 1/24',
      delay_seconds => 0);
END;
/

/*
orc2.world that correspond to users at the materialized view site by completing the following steps:The proxy materialized view administrator performs tasks at the target master site on behalf of the materialized view administrator at the materialized view site.
*/

CONNECT SYSTEM/MANAGER@orc2.world

CREATE USER proxy_mviewadmin IDENTIFIED BY proxy_mviewadmin;

BEGIN
   DBMS_REPCAT_ADMIN.REGISTER_USER_REPGROUP (
      username => 'proxy_mviewadmin',
      privilege_type => 'proxy_snapadmin',
      list_of_gnames => NULL);
END;
/

-- Place GRANT SELECT_CATALOG_ROLE statement here if necessary.

/*
If you want your materialized view administrator at materialized view sites to be able to perform administrative operations using the Replication Management tool, then grant SELECT_CATALOG_ROLE to proxy_mviewadmin:
*/

GRANT SELECT_CATALOG_ROLE TO proxy_mviewadmin;

/*
Granting this privilege to the proxy_mviewadmin is not required if you do not plan to use the Replication Management tool. However, if you plan to use the Replication Management tool, then move the GRANT statement to the line directly after the previous REGISTER_USER_REPGROUP statement.
The proxy refresher performs tasks at the master site on behalf of the refresher at the materialized view site.
*/

CREATE USER proxy_refresher IDENTIFIED BY proxy_refresher;

GRANT CREATE SESSION TO proxy_refresher;
GRANT SELECT ANY TABLE TO proxy_refresher;

/*
Complete the following steps to set up the orc3.world master site.
SYSTEM at orc3.world.|
Note: Multiple master sites (multimaster replication) can be used only with Oracle Enterprise Edition. If you are not using Oracle Enterprise Edition, then skip to "Setting Up Materialized View Sites". |
You must connect as SYSTEM to the database that you want to set up for replication.
*/

connect SYSTEM/MANAGER@orc3.world

/*
orc3.world.The replication administrator must be granted the necessary privileges to create and manage a replication environment. The replication administrator must be created at each database that participates in the replication environment.
*/

create user REPADMIN identified by REPADMIN;

/*
orc3.world by completing the following steps:GRANT_ADMIN_ANY_SCHEMA procedure to grant the replication administrator powerful privileges to create and manage a replicated environment.
*/

BEGIN
   DBMS_REPCAT_ADMIN.GRANT_ADMIN_ANY_SCHEMA (
      username => 'repadmin');
END;
/

/*
repadmin to be able to create materialized view logs for any replicated table, then grant COMMENT ANY TABLE and LOCK ANY TABLE to repadmin:
*/

GRANT COMMENT ANY TABLE TO repadmin;
GRANT LOCK ANY TABLE TO repadmin;

/*
repadmin to be able to connect to the Replication Management tool, then grant SELECT ANY DICTIONARY to repadmin:
*/

GRANT SELECT ANY DICTIONARY TO repadmin;

/*
orc3.world.The propagator is responsible for propagating the deferred transaction queue to other master sites.
*/

BEGIN
   DBMS_DEFER_SYS.REGISTER_PROPAGATOR (
      username => 'repadmin');
END;
/

/*
orc3.world.The receiver receives the propagated deferred transactions sent by the propagator from the other master sites.
*/

BEGIN
   DBMS_REPCAT_ADMIN.REGISTER_USER_REPGROUP (
      username => 'repadmin',
      privilege_type => 'receiver',
      list_of_gnames => NULL);
END;
/

/*
orc3.world.In order to keep the size of the deferred transaction queue in check, you should purge successfully completed deferred transactions. The SCHEDULE_PURGE API automates the purge process for you. You must execute this procedure as the replication administrator.
*/

CONNECT repadmin/repadmin@orc3.world

BEGIN
   DBMS_DEFER_SYS.SCHEDULE_PURGE (
      next_date => SYSDATE,
      interval => 'SYSDATE + 1/24',
      delay_seconds => 0);
END;
/

/*
orc1.world that correspond to users at the materialized view site by completing the following steps:The proxy materialized view administrator performs tasks at the target master site on behalf of the materialized view administrator at the materialized view site.
*/

CONNECT SYSTEM/MANAGER@orc3.world

CREATE USER proxy_mviewadmin IDENTIFIED BY proxy_mviewadmin;

BEGIN
   DBMS_REPCAT_ADMIN.REGISTER_USER_REPGROUP (
      username => 'proxy_mviewadmin',
      privilege_type => 'proxy_snapadmin',
      list_of_gnames => NULL);
END;
/

-- Place GRANT SELECT_CATALOG_ROLE statement here if necessary.

/*
If you want your materialized view administrator at materialized view sites to be able to perform administrative operations using the Replication Management tool, then grant SELECT_CATALOG_ROLE to proxy_mviewadmin:
*/
GRANT SELECT_CATALOG_ROLE TO proxy_mviewadmin;

/*
Granting this privilege to the proxy_mviewadmin is not required if you do not plan to use the Replication Management tool. However, if you plan to use the Replication Management tool, then move the GRANT statement to the line directly after the previous REGISTER_USER_REPGROUP statement.
The proxy refresher performs tasks at the master site on behalf of the refresher at the materialized view site.
*/

CREATE USER proxy_refresher IDENTIFIED BY proxy_refresher;

GRANT CREATE SESSION TO proxy_refresher;
GRANT SELECT ANY TABLE TO proxy_refresher;
/*
Complete the following steps to create scheduled links between the master sites.
The database links provide the necessary distributed mechanisms to allow the different replication sites to replicate data among themselves. Before you create any private database links, you must create the public database links that each private database link will use. You then must create a database link between all replication administrators at each of the master sites that you have set up.
| See Also:
Oracle9i Database Administrator's Guide for more information about database links |
*/

CONNECT SYSTEM/MANAGER@orc1.world
CREATE PUBLIC DATABASE LINK orc2.world USING 'orc2.world';
CREATE PUBLIC DATABASE LINK orc3.world USING 'orc3.world';

CONNECT repadmin/repadmin@orc1.world
CREATE DATABASE LINK orc2.world CONNECT TO repadmin IDENTIFIED BY repadmin;
CREATE DATABASE LINK orc3.world CONNECT TO repadmin IDENTIFIED BY repadmin;

CONNECT SYSTEM/MANAGER@orc2.world
CREATE PUBLIC DATABASE LINK orc1.world USING 'orc1.world';
CREATE PUBLIC DATABASE LINK orc3.world USING 'orc3.world';

CONNECT repadmin/repadmin@orc2.world
CREATE DATABASE LINK orc1.world CONNECT TO repadmin IDENTIFIED BY repadmin;
CREATE DATABASE LINK orc3.world CONNECT TO repadmin IDENTIFIED BY repadmin;

CONNECT SYSTEM/MANAGER@orc3.world
CREATE PUBLIC DATABASE LINK orc1.world USING 'orc1.world';
CREATE PUBLIC DATABASE LINK orc2.world USING 'orc2.world';

CONNECT repadmin/repadmin@orc3.world
CREATE DATABASE LINK orc1.world CONNECT TO repadmin IDENTIFIED BY repadmin;
CREATE DATABASE LINK orc2.world CONNECT TO repadmin IDENTIFIED BY repadmin;

/*
Create a scheduled link by defining a database link when you execute the SCHEDULE_PUSH procedure. The scheduled link determines how often your deferred transaction queue is propagated to each of the other master sites. You need to execute the SCHEDULE_PUSH procedure for each database link that you created in Step 1. The database link is specified in the destination parameter of the SCHEDULE_PUSH procedure.
Even when using Oracle's asynchronous replication mechanisms, you can configure a scheduled link to simulate continuous, real-time replication. The scheduled links in this example simulate continuous replication.
| See Also:
Oracle9i Replication for more information about simulating continuous replication |
*/

CONNECT repadmin/repadmin@orc1.world

BEGIN
   DBMS_DEFER_SYS.SCHEDULE_PUSH (
      destination => 'orc2.world',
      interval => 'SYSDATE + (1/144)',
      next_date => SYSDATE,
      parallelism => 1,
      execution_seconds => 1500,
      delay_seconds => 1200);
END;
/

BEGIN
   DBMS_DEFER_SYS.SCHEDULE_PUSH (
      destination => 'orc2.world',
      interval => 'SYSDATE + (1/144)',
      next_date => SYSDATE,
      parallelism => 1,
      execution_seconds => 1500,
      delay_seconds => 1200);
END;
/

BEGIN
DBMS_DEFER_SYS.SCHEDULE_PUSH (
      destination => 'orc3.world',
      interval => 'SYSDATE + (1/144)',
      next_date => SYSDATE,
      parallelism => 1,
      execution_seconds => 1500,
      delay_seconds => 1200);
END;
/

CONNECT repadmin/repadmin@orc2.world

BEGIN
   DBMS_DEFER_SYS.SCHEDULE_PUSH (
      destination => 'orc1.world',
      interval => 'SYSDATE + (1/144)',
      next_date => SYSDATE,
      parallelism => 1,
      execution_seconds => 1500,
      delay_seconds => 1200);
END;
/

BEGIN
   DBMS_DEFER_SYS.SCHEDULE_PUSH (
      destination => 'orc3.world',
      interval => 'SYSDATE + (1/144)',
      next_date => SYSDATE,
      parallelism => 1,
      execution_seconds => 1500,
      delay_seconds => 1200);
END;
/

CONNECT repadmin/repadmin@orc3.world

BEGIN
   DBMS_DEFER_SYS.SCHEDULE_PUSH (
      destination => 'orc1.world',
      interval => 'SYSDATE + (1/144)',
      next_date => SYSDATE,
      parallelism => 1,
      execution_seconds => 1500,
      delay_seconds => 1200);
END;
/

BEGIN
   DBMS_DEFER_SYS.SCHEDULE_PUSH (
      destination => 'orc2.world',
      interval => 'SYSDATE + (1/144)',
      next_date => SYSDATE,
      parallelism => 1,
      execution_seconds => 1500,
      delay_seconds => 1200);
END;
/

SET ECHO OFF

SPOOL OFF

/**************************END OF SCRIPT***********************************/
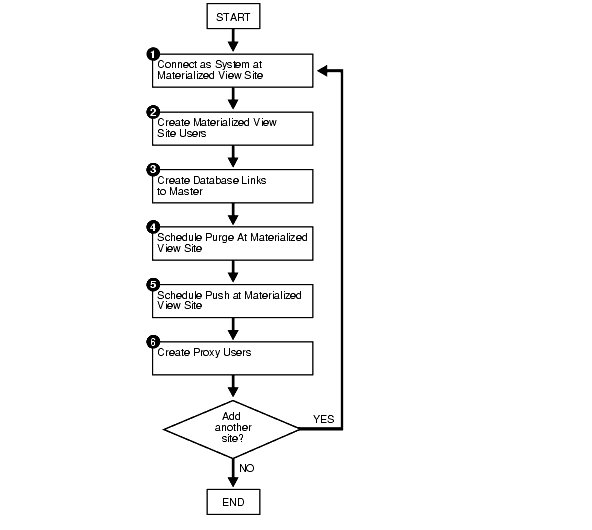
Complete the following steps to set up the mv1.world master materialized view site. mv1.world is a master materialized view site because mv2.world will be based on it.
/************************* BEGINNING OF SCRIPT ******************************
SYSTEM at materialized view site at mv1.world.You must connect as SYSTEM to the database that you want to set up as a materialized view site.
*/

SET ECHO ON

SPOOL setup_mvs.out

CONNECT SYSTEM/MANAGER@mv1.world

/*
mv1.world.Several users must be created at the materialized view site. These users are:
Complete the following steps to create these users.
The materialized view administrator is responsible for creating and managing the materialized view site. Execute the GRANT_ADMIN_ANY_SCHEMA procedure to grant the materialized view administrator the appropriate privileges.
*/

create user MVIEWADMIN identified by MVIEWADMIN;

BEGIN
   DBMS_REPCAT_ADMIN.GRANT_ADMIN_ANY_SCHEMA (
      username => 'mviewadmin');
END;
/

GRANT COMMENT ANY TABLE TO mviewadmin;

GRANT LOCK ANY TABLE TO mviewadmin;

/*
mviewadmin to be able to connect to the Replication Management tool, then grant SELECT ANY DICTIONARY to mviewadmin:
*/

GRANT SELECT ANY DICTIONARY TO mviewadmin;

/*
The propagator is responsible for propagating the deferred transaction queue to the target master site.
*/

CREATE USER propagator IDENTIFIED BY propagator;

BEGIN
   DBMS_DEFER_SYS.REGISTER_PROPAGATOR (
      username => 'propagator');
END;
/

/*
The refresher is responsible for "pulling" changes made to the replicated tables at the target master site to the materialized view site. This user refreshes one or more materialized views. If you want the mviewadmin user to be the refresher, then this step is not required.
*/

CREATE USER refresher IDENTIFIED BY refresher;

GRANT CREATE SESSION TO refresher;

GRANT ALTER ANY MATERIALIZED VIEW TO refresher;

/*
The receiver receives the propagated deferred transactions sent by the propagator from materialized view sites. The receiver is necessary only if the site will function as a master materialized view site for other materialized view sites.
*/

BEGIN
   DBMS_REPCAT_ADMIN.REGISTER_USER_REPGROUP (
      username => 'mviewadmin',
      privilege_type => 'receiver',
      list_of_gnames => NULL);
END;
/

/*
*/

CONNECT SYSTEM/MANAGER@mv1.world

CREATE PUBLIC DATABASE LINK orc1.world USING 'orc1.world';

/*
You need to create a database link from the materialized view administrator at the materialized view site to the proxy materialized view administrator at the master site.
*/

CONNECT mviewadmin/mviewadmin@mv1.world;

CREATE DATABASE LINK orc1.world
  CONNECT TO proxy_mviewadmin IDENTIFIED BY proxy_mviewadmin;

/*
You need to create a database link from the propagator at the materialized view site to the receiver at the master site. The receiver was defined when you created the master site.
*/

CONNECT propagator/propagator@mv1.world

CREATE DATABASE LINK orc1.world
  CONNECT TO repadmin IDENTIFIED BY repadmin;

/*
| See Also:
Step 5 |
mv1.world materialized view site.In order to keep the size of the deferred transaction queue in check, you should purge successfully completed deferred transactions. The SCHEDULE_PURGE procedure automates the purge process for you. If your materialized view site only contains "read-only" materialized views, then you do not need to execute this procedure.
*/

CONNECT mviewadmin/mviewadmin@mv1.world

BEGIN
   DBMS_DEFER_SYS.SCHEDULE_PURGE (
   next_date => SYSDATE,
   interval => 'SYSDATE + 1/24',
   delay_seconds => 0,
   rollback_segment => '');
END;
/

/*
mv1.world materialized view site. If the materialized view site is disconnected from its master site for extended periods of time, then it is typically better not to schedule push and refresh on demand, which pushes changes to the master site.The SCHEDULE_PUSH procedure schedules when the deferred transaction queue should be propagated to the target master site.
*/

CONNECT mviewadmin/mviewadmin@mv1.world

BEGIN
   DBMS_DEFER_SYS.SCHEDULE_PUSH (
      destination => 'orc1.world',
      interval => 'SYSDATE + 1/24',
      next_date => SYSDATE,
      stop_on_error => FALSE,
      delay_seconds => 0,
      parallelism => 0);
END;
/

/*
mv1.world materialized view site by completing the following steps.The proxy materialized view administrator performs tasks at the target master materialized view site on behalf of the materialized view administrator at the materialized view sites based on this materialized view site. This user is not required if the site will not function as a master materialized view site for other materialized view sites.
*/

CONNECT SYSTEM/MANAGER@mv1.world

CREATE USER proxy_mviewadmin IDENTIFIED BY proxy_mviewadmin;

BEGIN
   DBMS_REPCAT_ADMIN.REGISTER_USER_REPGROUP (
      username => 'proxy_mviewadmin',
      privilege_type => 'proxy_snapadmin',
      list_of_gnames => NULL);
END;
/

-- Place GRANT SELECT_CATALOG_ROLE statement here if necessary.

/*
If you want your materialized view administrator at materialized view sites based on this materialized view site to be able to perform administrative operations using the Replication Management tool, then grant SELECT_CATALOG_ROLE to proxy_mviewadmin:
GRANT SELECT_CATALOG_ROLE TO proxy_mviewadmin;
Granting this privilege to the proxy_mviewadmin is not required if you do not plan to use the Replication Management tool. However, if you plan to use the Replication Management tool, then move the GRANT statement to the line directly after the previous REGISTER_USER_REPGROUP statement.
The proxy refresher performs tasks at the master materialized view site on behalf of the refresher at the materialized view sites based on this materialized view site. This user is not required if the site will not function as a master materialized view site for other materialized view sites.
*/

CREATE USER proxy_refresher IDENTIFIED BY proxy_refresher;

GRANT CREATE SESSION TO proxy_refresher;
GRANT SELECT ANY TABLE TO proxy_refresher;

/*
Complete the following steps to set up the mv2.world materialized view site. mv2.world is part of a multitier materialized view configuration because it is based on mv1.world, another materialized view.
SYSTEM at level 2 materialized view site mv2.world.You must connect as SYSTEM to the database that you want to set up as a level 2 materialized view site. This site, mv2.world, will be a materialized view site that is based on mv1.world.
*/

CONNECT SYSTEM/MANAGER@mv2.world

/*
mv2.world.Several users must be created at the level 2 materialized view site. These users are:
Complete the following steps to create these users.
The materialized view administrator is responsible for creating and managing the level 2 materialized view site. Execute the GRANT_ADMIN_ANY_SCHEMA procedure to grant the materialized view administrator the appropriate privileges.
*/

create user MVIEWADMIN identified by MVIEWADMIN;

BEGIN
   DBMS_REPCAT_ADMIN.GRANT_ADMIN_ANY_SCHEMA (
      username => 'mviewadmin');
END;
/

/*
mviewadmin to be able to connect to the Replication Management tool, then grant SELECT ANY DICTIONARY to mviewadmin:
*/

GRANT SELECT ANY DICTIONARY TO mviewadmin;

/*
The propagator is responsible for propagating the deferred transaction queue to the target master materialized view site.
*/

CREATE USER propagator IDENTIFIED BY propagator;

BEGIN
   DBMS_DEFER_SYS.REGISTER_PROPAGATOR (
      username => 'propagator');
END;
/

/*
The refresher is responsible for "pulling" changes made to the replicated materialized views at the target master materialized view site to the level 2 materialized view site.
*/

CREATE USER refresher IDENTIFIED BY refresher;

GRANT CREATE SESSION TO refresher;
GRANT ALTER ANY MATERIALIZED VIEW TO refresher;

/*
*/

CONNECT SYSTEM/MANAGER@mv2.world

CREATE PUBLIC DATABASE LINK mv1.world USING 'mv1.world';

/*
You need to create a database link from the materialized view administrator at the level 2 materialized view site to the proxy materialized view administrator at the master materialized view site.
*/

CONNECT mviewadmin/mviewadmin@mv2.world;

CREATE DATABASE LINK mv1.world
  CONNECT TO proxy_mviewadmin IDENTIFIED BY proxy_mviewadmin;

/*
You need to create a database link from the propagator at the level 2 materialized view site to the receiver at the master materialized view site. The receiver was defined when you created the master materialized view site.
*/

CONNECT propagator/propagator@mv2.world

CREATE DATABASE LINK mv1.world
  CONNECT TO mviewadmin IDENTIFIED BY mviewadmin;

/*
mv2.world.In order to keep the size of the deferred transaction queue in check, you should purge successfully completed deferred transactions. The SCHEDULE_PURGE procedure automates the purge process for you. If your level 2 materialized view site only contains "read-only" materialized views, then you do not need to execute this procedure.
*/

CONNECT mviewadmin/mviewadmin@mv2.world

BEGIN
   DBMS_DEFER_SYS.SCHEDULE_PURGE (
     next_date => SYSDATE,
     interval => 'SYSDATE + 1/24',
     delay_seconds => 0,
     rollback_segment => '');
END;
/

/*
mv2.world materialized view site. If the materialized view site is disconnected from its master materialized view site for extended periods of time, then it is typically better not to schedule push and refresh on demand, which pushes changes to the master materialized view site.The SCHEDULE_PUSH procedure schedules when the deferred transaction queue should be propagated to the target master materialized view site.
*/

CONNECT mviewadmin/mviewadmin@mv2.world

BEGIN
   DBMS_DEFER_SYS.SCHEDULE_PUSH (
      destination => 'mv1.world',
      interval => 'SYSDATE + 1/24',
      next_date => SYSDATE,
      stop_on_error => FALSE,
      delay_seconds => 0,
      parallelism => 0);
END;
/

SET ECHO OFF

SPOOL OFF

/************************* END OF SCRIPT **********************************/
|
 Copyright © 1996, 2002 Oracle Corporation. All Rights Reserved. |
|

