Release 2 (9.2)
Part Number A96567-01
 Home |
 Book List |
 Contents |
 Index |
 Master Index |
 Feedback |
| Oracle9i Advanced Replication Release 2 (9.2) Part Number A96567-01 |
|
The Replication Management tool is part of Oracle Enterprise Manager and provides a graphical user interface (GUI) for setting up, managing, and monitoring a replication environment. The Replication Management tool includes wizards that guide you through many important operations. You can use the Replication Management tool to manage both multimaster and materialized view replication environments.
This chapter introduces you to the features of the Replication Management tool. However, the primary documentation for using this tool is the Replication Management tool online help. This chapter contains the following topics:
Using the Replication Management tool, you can:
Assuming Oracle Enterprise Manager is configured to show the databases in your replication environment, complete the following steps to log in to the Replication Management tool:
If you have an established replication environment, then log in as the replication administrator. If you have not set up a replication environment, then log in as SYSTEM or SYS user. Next, use the Setup Wizard to set up your master definition site and, if you want a multimaster replication environment, your other master sites.
When setup is complete, log in to the Replication Management tool as the replication administrator you specified in the Setup Wizard. If you follow convention, then the username of the replication administrator is repadmin. You should only log in to the Replication Management tool as the replication administrator, not as any other user, after setup is complete.
The Replication Management tool interface in Oracle Enterprise Manager includes a toolbar on the far left and two panes: the navigator pane on the left and the right pane. The navigator pane displays a tree structure for your databases, and the right pane displays property sheets.

Text description of the illustration repintro.jpg
The navigator pane in the Oracle Enterprise Manager functions the same way as it does in other Oracle Enterprise Manager applications. That is, the navigator pane lets you:
Oracle completely redesigned the navigator tree structure in the Replication Management tool in a recent release. You begin many replication administration operations by selecting the correct object or folder in the navigator tree of the Replication Management tool.
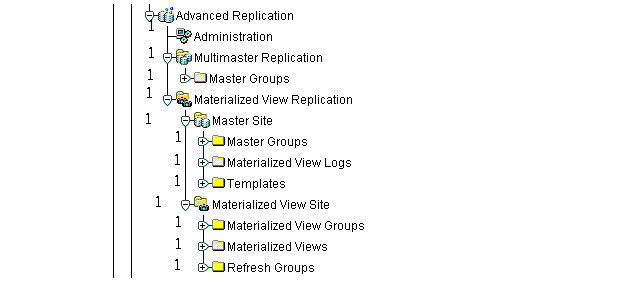
The following sections describe the contents of each object and folder in the tree structure.
The Administration object enables you to manage the entire replication site. Select the Administration object to display the following tabs in the right pane:
DBMS_JOBS package. Many of these jobs perform important replication functions, such as pushing deferred transactions and purging the deferred transactions queue.If your replication environment is configured for multimaster replication, then you use the Multimaster Replication object to set up your master sites and manage your master groups. To set up master sites with the Setup Wizard, right-click the Multimaster Replication object and select Setup Master Sites.
|
Note: Oracle Enterprise Edition is required for multimaster replication. If your installation is Oracle Standard Edition, then you can have only one master site for each master group. |
The Master Groups folder contains the master groups at the selected site. When you select a master group, you can:
To create a new master group, right-click the Master Groups folder and select Create.
The Materialized View Replication object lets you administer the replication site as it relates to materialized view replication. You can administer sites that are master sites of materialized view sites, and you can administer materialized view sites themselves. To set up master sites or materialized view sites with the Setup Wizard, right-click the Materialized View Replication object and select Setup Sites.
The Materialized View Replication object contains the following objects:
This object lets you manage the master groups at the replication site, and lets you manage sites that are master sites of materialized view sites. Specifically, this object lets you create, manage, and package deployment templates, and lets you create and manage materialized view logs. To set up master sites with the Setup Wizard, right-click the Master Site object and select Setup Master Sites.
The Master Site object has the following folders:
This object lets you manage materialized view sites. Specifically, this object lets you create and manage materialized view groups, materialized views, and refresh groups. To set up materialized view sites with the Setup Wizard, right-click the Materialized View Site object and select Setup Materialized View Sites.
The Materialized View Site object has the following folders:
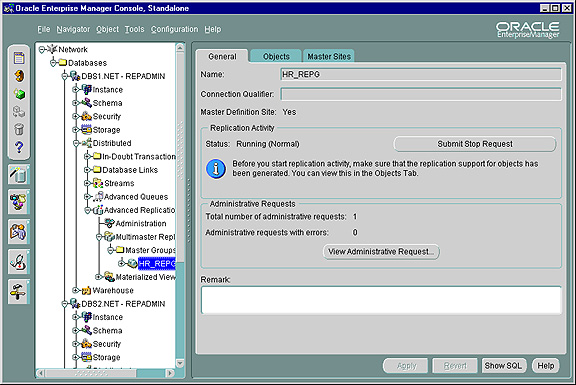
The right pane of the Replication Management tool enables you to monitor and manage your replication environment. Figure 7-3 shows an example of the General tab in the Master Group property sheet.
Text description of the illustration repprop.jpg
When you are working with a property sheet, you may click a button that opens a dialog box. For example, if you click the View Administrative Request button on the General property sheet for a master group, then the Administrative Requests dialog box appears, as shown in Figure 7-4.

Text description of the illustration adminreq.jpg
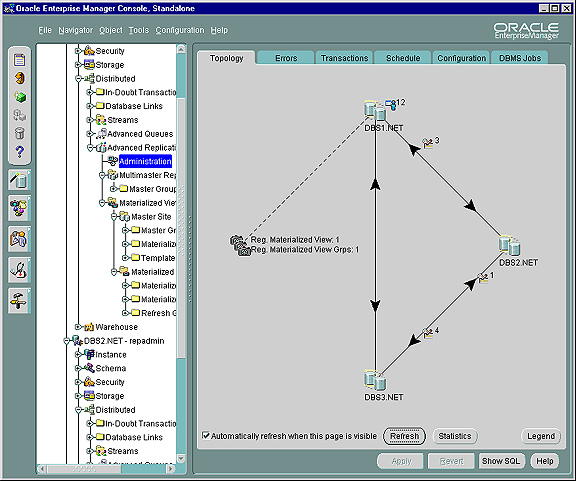
You can use the right pane of the Replication Management tool to monitor your replication environment. The Topology tab of the Administration property sheet is an example of a monitoring tool that is available to you. This tab displays a graphical representation of the nodes in your replication environment and the links between them.
Specifically, the Topology tab provides the following information:
The Topology tab only displays values if they are greater than zero. For example, if there are zero administrative requests at a master site, then the number of administrative requests is not displayed. If you are connected to a replication site that is running Oracle9i or higher, then the Topology tab also displays a Statistics button. Click this button to view performance statistics for the replication site.
The Topology tab displays the following icons and images:
| Icon/Image | Description |
|---|---|
|
|
Indicates a master site. |
|
|
Shows the current number of administrative requests being processed at the site with which it is associated. |
|
|
Indicates a master site with deferred transaction errors or administrative request errors or both. |
|
|
Shows the current number of deferred transactions to be applied at the site to which the associated arrow is pointing. |
|
|
Shows the number of deferred transaction errors at the site with which it is associated. |
|
|
Indicates a site that is functioning as both a master site and a materialized view site (a dual site). |
|
|
Indicates a dual site with deferred transaction errors or administrative request errors or both. |
|
|
When you are connected to a master site, indicates that the master site has materialized view sites. Materialized views or materialized view groups or both may be registered at the master site. |
|
|
When you are connected to a materialized view site, indicates the materialized view site. |
|
|
Indicates a materialized view site with errors. |

Text description of the illustration blackarrow.gif (Solid black arrow) |
Indicates a working database link from the current master site to the remote master site. Note: The Replication Management tool does not test the database link at the remote site. Therefore, the database link from the remote site to the current site may be working or broken. To find out, connect to the remote site in Oracle Enterprise Manager and view the Topology tab. |

Text description of the illustration redarrow.gif (Dashed red arrow) |
Indicates a broken database link from the current master site to the remote master site. Note: If you are not logged in as the replication administrator (typically |

Text description of the illustration blkarrw2.gif (One way black arrow) |
When you are connected to a materialized view site, indicates a database link between the materialized view site and a master site. There may or may not be a network connection currently between the two sites. |

Text description of the illustration blackdots_t.gif (Dashed black line) |
Indicates one or more database links between materialized view sites and a master site. There may or may not be a network connection currently between the sites. |
Text description of the illustration topology.jpg
When connected to the master database orc1.world, this example Topology tab provides the following information:
orc1.world and orc2.world are master sites in the same replication environment.orc1.world is functioning only as a master site and not as a materialized view site, based on the icon for the database. The other master database (orc2.world) may be functioning only as a master site, or it may be functioning as a dual site. To find out, you can connect to orc2.world.orc1.world has two administrative requests to process.orc1.world has no local deferred transaction errors and no local administrative request errors.orc2.world has no administrative requests to process.orc2.world has no local deferred transaction errors and no local administrative request errors.orc1.world has eight deferred transactions in its deferred transaction queue that will be applied at orc2.world.orc2.world has three deferred transactions in its deferred transaction queue that will be applied at orc1.world.orc1.world is the master site for one registered materialized view group and 15 registered materialized views. These registered materialized views may be spread over several materialized view sites.The other master databases in this replication environment may also have materialized view sites, but they are only visible on the Topology tab when you are connected to those other databases. For example, to see if the master database orc2.world has any materialized view sites, connect to the orc2.world database in Oracle Enterprise Manager and open the Topology tab.
The Replication Management tool wizards provide step-by-step guidance for tasks that require many steps. The wizards simplify complex tasks by guiding you through the task in manageable steps. The following sections describe the Replication Management tool wizards:
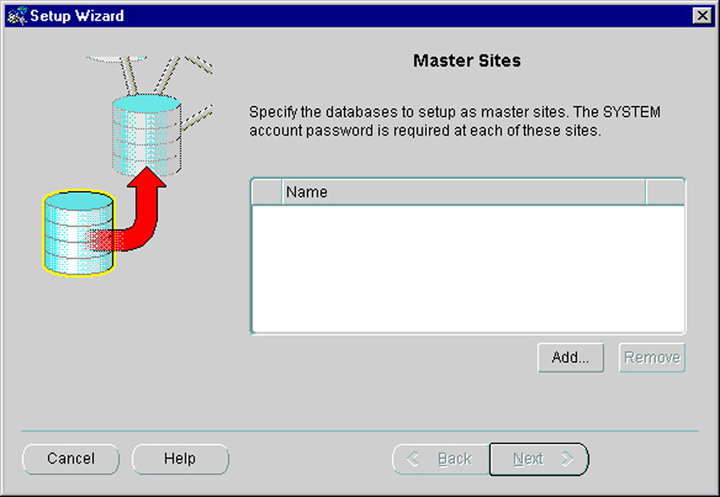
The Setup Wizard guides you through setting up master sites and materialized view sites for replication. Preparing sites for replication is a simple process using the Setup Wizard. At each site that you specify, the Setup Wizard performs the following steps:
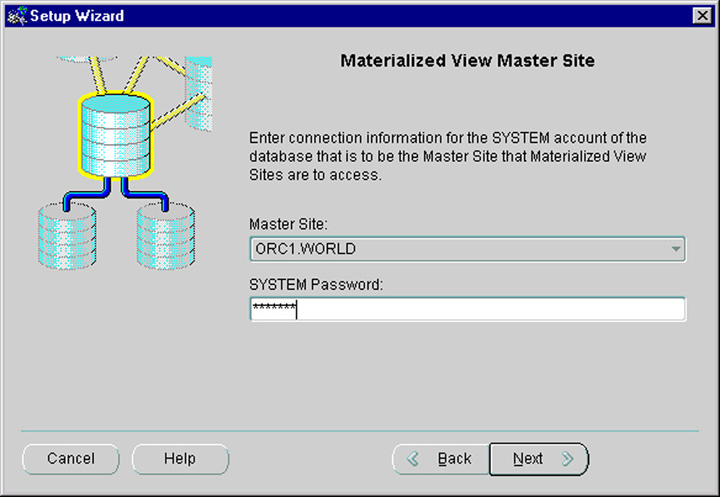
repadmin, and the default username at a materialized view site is mvadmin. However, you can change these usernames if you wish.The Setup Wizard is slightly different for master sites than for materialized view sites. To open the Setup Wizard to set up master sites, right-click the Multimaster Replication object in the navigator pane and select Setup Master Sites.
Text description of the illustration rmsetmas.jpg
To open the Setup Wizard to set up materialized view sites, right-click the Materialized View Site object in the navigator pane and select Setup Materialized View Sites.
|
Note: The Setup Wizard sets up materialized view sites with untrusted security. Oracle9i Replication Management API Reference for more information about untrusted security. |
Text description of the illustration rmsetsna.jpg
See Also:
|
The Materialized View Group Wizard guides you through creating a group of materialized views based on a master group. Each materialized view can be a partial or complete copy of the master tables in its source master group. Materialized view groups are located at remote materialized view sites and are based on a single, target master group at a master site.
Run the Materialized View Group Wizard at the materialized view site where you want to create the materialized view group. To open the Materialized View Group Wizard, right-click the Materialized View Groups folder in the navigator pane and select Create Using Wizard.
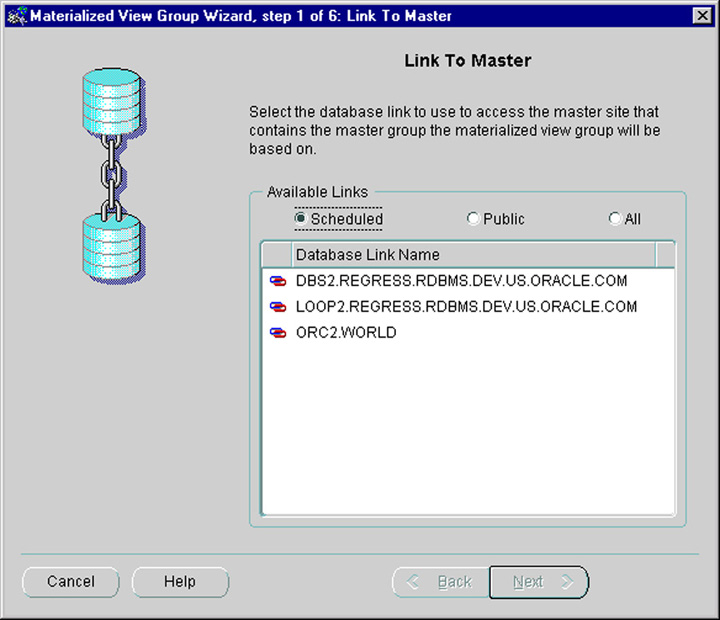
Text description of the illustration rmsnapgr.jpg
| See Also:
"Materialized View Groups" for more information about materialized view groups |
Deployment templates simplify the task of deploying and maintaining many remote materialized view sites. Using deployment templates, you can define a collection of materialized view definitions at a master site and use parameters in these definitions to customize the materialized views for individual users or types of users.
For example, you might create one template for the sales force and another template for field service representatives. In this case, a parameter value might be the sales territory or the customer support level. When a user instantiates a template by running a SQL script, the appropriate materialized views are created and populated at the remote site.
The Deployment Template Wizard guides you through creating a deployment template. Individual screens in the Deployment Template Wizard let you:
Run the Deployment Template Wizard from the master site where you want to create the deployment template. To open the deployment template wizard, right-click the Templates folder in the navigator pane and select Create Using Wizard.
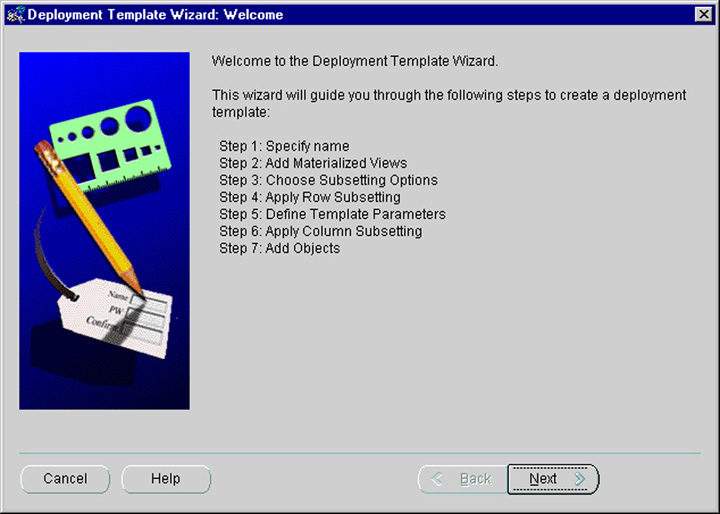
Text description of the illustration rmdeptmp.jpg
| See Also:
Chapter 4, "Deployment Templates Concepts and Architecture" for more information about deployment templates |
Offline instantiation allows an end user to use a generated file to instantiate a template without being connected to the master site through a network. The Template Script Generation Wizard enables you to write all of the necessary DDL and data to a file that you then transfer and run at your materialized view site. This solution is best suited for laptop users with low-speed WAN connections, or in other cases where connectivity is unstable or slow.
The Template Script Generation Wizard guides you through packaging a deployment template for offline instantiation. The Template Script Generation Wizard generates offline instantiation files that you use to build materialized views and other objects at your materialized view sites.
Run the Template Script Generation Wizard at the master site that contains the template for which you want to generate the offline instantiation files. To run the Template Script Generation Wizard, right-click the Templates folder in the navigator pane and select Template Script Generation.
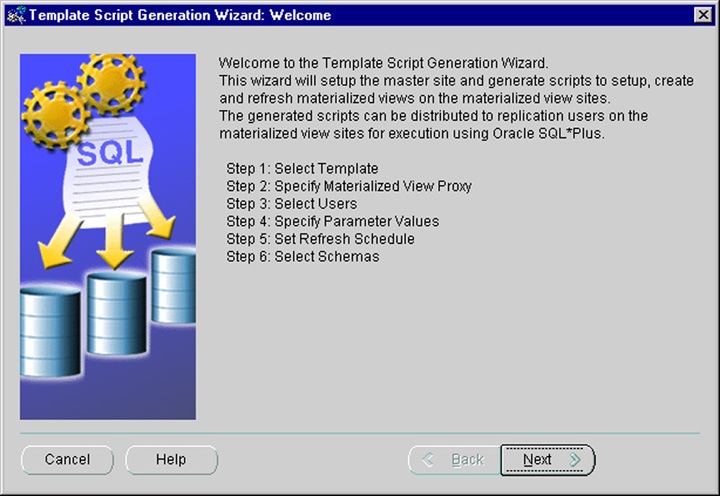
Text description of the illustration rmoffinst.jpg
|
Note: To generate online instantiation files, you must use the replication management API. See Oracle9i Replication Management API Reference for information about generating online instantiation files. |
| See Also:
"Packaging and Instantiation Process" for more information on packaging and instantiating deployment templates |
The Copy Template Wizard guides you through copying a deployment template. You may need to copy them to multiple master sites for various reasons. For example, you may want to:
Run the Copy Template Wizard from the master site that contains the deployment template. To open the Copy Template Wizard, right-click the Templates folder in the navigator pane and select Copy.

Text description of the illustration rmcpytmp.jpg
The flowchart in Figure 7-12 displays the major decisions and tasks that are involved when you create a replication environment using the Replication Management tool. The flowchart shows the major decisions and steps for building both multimaster and materialized view environments. Each task in the flowchart includes a cross reference to a section in this book that provides more information about the task. Detailed instructions about completing these tasks are in the Replication Management tool online help.

|
 Copyright © 1996, 2002 Oracle Corporation. All Rights Reserved. |
|


