Release 9.2
Part Number A96574-01
 Home |
 Book List |
 Contents |
 Index |
 Master Index |
 Feedback |
| Oracle Internet Directory Administrator's Guide Release 9.2 Part Number A96574-01 |
|
This appendix provides syntax, usage notes, and examples for LDAP Data Interchange Format (LDIF) and LDAP command-line tools. It contains these topics:
The standardized file format for directory entries is as follows:
dn: distinguished_name
attribute_type: attribute_value
.

.

.
objectClass: object_class_value
.

.

.
The following example shows a file entry for an employee. The first line contains the DN. The lines that follow the DN begin with the mnemonic for an attribute, followed by the value to be associated with that attribute. Note that each entry ends with lines defining the object classes for the entry.
dn: cn=Suzie Smith,ou=Server Technology,o=Acme, c=US

cn: Suzie Smith

cn: SuzieS

sn: Smith

email: ssmith@us.Acme.com

telephoneNumber: 69332

photo: /ORACLE_HOME/empdir/photog/ssmith.jpg

objectClass: organizationalPerson

objectClass: person
objectClass: top
The next example shows a file entry for an organization:
dn: o=Acme,c=US

o: Acme

ou: Financial Applications

objectClass: organization
objectClass: top
A list of formatting rules follows. This list is not exhaustive.
| Tip:
To see the mandatory and optional attribute types for an object class, use Oracle Directory Manager. See "Viewing Properties of Object Classes by Using Oracle Directory Manager". |
See Also:
|
This section tells how to use command-line tools for starting, stopping, restarting, and monitoring Oracle Internet Directory servers. It contains these topics:
Use the OID Monitor to initiate, monitor, and terminate directory server processes. If you elect to install a replication server, OID Monitor controls it. When you issue commands through OID Control Utility (OIDCTL) to start or stop directory server instances, your commands are interpreted by this process.
To start the OID Monitor:
NLS_LANG=APPROPRIATE_LANGUAGE.AL32UTF8
oidmon [connect=net_service_name] [sleep=seconds] start
For example:
oidmon connect=dbs1sleep=10 start
To stop the OID Monitor daemon, at the system prompt, type:
oidmon [connect=net_service_name]stop
For example:
oidmon connect=dbs1 stop
OID Control Utility is a command-line tool for starting and stopping the directory server. The commands are interpreted and executed by the OID Monitor process.
This section contains these topics:
Use the OID Control Utility to start and stop Oracle directory server instances.
The syntax for starting an Oracle directory server instance is:
oidctl connect=net_service_nameserver=oidldapdinstance=server_instance_number[configset=configset_number] [flags='-p port_number -work maximum_number_of_ worker_threads_per_server -server number_of_server_processes -debug debug_level -l change-logging -server n']start
For example, to start an Oracle directory server instance whose net service name is dbs1, using configset5,at port 12000, with a debug level of 1024, an instance number 3, and in which change-logging is turned off, type at the system prompt:
oidctl connect=dbs1server=oidldapd instance=3 configset=5 flags='-p 12000
-debug 1024 -l' start
When starting and stopping an Oracle directory server instance, the server name and instance number are mandatory. All other arguments are optional.
All keyword value pairs within the flags arguments must be separated by a single space.
Single quotes are mandatory around the flags.
The configset identifier defaults to zero (configset0) if not set.
At the system prompt, type:
oidctl connect=net_service_name server=oidldapd instance=server_instance_number
stop
For example:
oidctl connect=dbs1server=oidldapd instance=3 stop
Use the OID Control Utility to start and stop Oracle directory replication server instances.
The syntax for starting the Oracle directory replication server is:
oidctl connect=net_service_name server=oidrepld instance=server_instance_number
[configset=configset_number] flags='-h hostname -p port_number

-d debug_level -z transaction_size' start
For example, to start the replication server with an instance=1, at port 12000, with debugging set to 1024, type at the system prompt:
oidctl connect=dbs1 server=oidrepld instance=1 flags='-p 12000 -h eastsun11 -d
1024' start
When starting and stopping an Oracle directory replication server, the -h flag, which specifies the host name, is mandatory. All other flags are optional.
All keyword value pairs within the flags arguments must be separated by a single space.
Single quotes are mandatory around the flags.
The configset identifier defaults to zero (configset0) if not set.
At the system prompt, type:
oidctl connect=net_service_name server=oidrepld instance=server_instance_number
stop
For example:
oidctl connect=dbs1server=oidrepld instance=1 stop
To restart a directory server instance, at the system prompt, type:
oidctl connect=net_service_name server={oidldapd|oidrepld}

instance=server_instance_number  restart
OID Monitor must be running whenever you start, stop, or restart directory server instances.
If you try to contact a server that is down, you receive from the SDK the error message 81--LDAP_SERVER_DOWN.
If you change a configuration set entry that is referenced by an active server instance, you must stop that instance and restart it to effect the changed value in the configuration set entry on that server instance. You can either issue the STOP command followed by the START command, or you can use the RESTART command. RESTART both stops and restarts the server instance.
For example, suppose that Oracle directory server instance1 is started, using configset3, and with the net service name dbs1. Further, suppose that, while instance1 is running, you change one of the attributes in configset3. To enable the change in configset3 to take effect on instance1, you enter the following command:
oidctl connect=dbs1 server=oidldapd instance=1 restart
If there are more than one instance of the Oracle directory server running on that node using configset3, then you can restart all the instances at once by using the following command syntax:
oidctl connect=dbs1 server=oidldapd restart
Note that this command restarts all the instances running on the node, whether they are using configset3 or not.
|
Important Note: During the restart process, clients cannot access the Oracle directory server instance. However, the process takes only a few seconds to execute. |
If the directory server fails to start, you can override all user-specified configuration parameters to start the directory server and then return the configuration sets to a workable state by using the ldapmodify operation.
To start the directory server by using its hard-coded default parameters instead of the configuration parameters stored in the directory, type at the system prompt:
oidctl connect=net_service_name flags='-p port_number -f'
The -f option in the flags starts the server with hard-coded configuration values, overriding any defined configuration sets except for the values in configset0.
To see debug log files generated by the OID Control Utility, navigate to $ORACLE_HOME/ldap/log.
This section tells you how to use the following tools:
The ldapadd command-line tool enables you to add entries, their object classes, attributes, and values to the directory. To add attributes to an existing entry, use the ldapmodify command, explained in "ldapmodify Syntax".
| See Also:
"Adding Configuration Set Entries by Using ldapadd" for an explanation of using ldapadd to configure a server with an input file |
ldapadd uses this syntax:
ldapadd[arguments] -f filename
where filename is the name of an LDIF file written with the specifications explained in the section "LDAP Data Interchange Format (LDIF) Syntax".
The following example adds the entry specified in the LDIF file
my_ldif_file.ldi:
ldapadd -p 389 -h myhost -f my_ldif_file.ldi
| Optional Arguments | Description |
|---|---|
|
-b |
Specifies that you have included binary file names in the file, which are preceded by a forward slash character. The tool retrieves the actual values from the file referenced. |
|
-c |
Tells ldapadd to proceed in spite of errors. The errors will be reported. (If you do not use this option, ldapadd stops when it encounters an error.) |
|
-D "binddn" |
When authenticating to the directory, specifies doing so as the entry specified in binddn. Use this with the |
|
-E "character_set" |
Specifies native character set encoding. See Chapter 8, "Globalization Support in the Directory". |
|
-f filename |
Specifies the input name of the LDIF format import data file. For a detailed explanation of how to format an LDIF file, see "LDAP Data Interchange Format (LDIF) Syntax". |
|
-h ldaphost |
Connects to ldaphost, rather than to the default host, that is, your local computer. ldaphost can be a computer name or an IP address. |
|
-K |
Same as |
|
-k |
Authenticates using Kerberos authentication instead of simple authentication. To enable this option, you must compile with KERBEROS defined. You must already have a valid ticket granting ticket. |
|
|
Instructs the tool to send the |
|
-n |
Shows what would occur without actually performing the operation |
|
-O ref_hop_limit |
Specifies the number of referral hops that a client should process. The default value is 5. |
|
-p directory_server_port_number |
Connects to the directory on TCP port directory_server_port_number. If you do not specify this option, the tool connects to the default port (389). |
|
-P wallet_password |
Specifies wallet password required for one-way or two-way SSL connections |
|
-U SSLAuth |
Specifies SSL authentication mode: |
|
-v |
Specifies verbose mode |
|
-V ldap_version |
Specifies the version of the LDAP protocol to use. The default value is 3, which causes the tool to use the LDAP v3 protocol. A value of 2 causes the tool to use the LDAP v2 protocol. |
|
-w password |
Provides the password required to connect |
|
-W wallet_location |
Specifies wallet location required for one-way or two-way SSL connections. For example, on UNIX, you could set this parameter as follows: -W "file:/home/my_dir/my_wallet" On Windows NT, you could set this parameter as follows: -W "file:C:\my_dir\my_wallet" |
ldapaddmt is like ldapadd: It enables you to add entries, their object classes, attributes, and values to the directory. It is unlike ldapadd in that it supports multiple threads for adding entries concurrently.
While it is processing LDIF entries, ldapaddmt logs errors in the add.log file in the current directory.
ldapaddmt uses this syntax:
ldapaddmt -T number_of_threads -h host -p port -f filename
where filename is the name of an LDIF file written with the specifications explained in the section "LDAP Data Interchange Format (LDIF) Syntax".
The following example uses five concurrent threads to process the entries in the file myentries.ldif.
ldapaddmt -T 5 -h node1 -p 3000 -f myentries.ldif
|
Note: Increasing the number of concurrent threads improves the rate at which LDIF entries are created, but consumes more system resources. |
| Optional Arguments | Description |
|---|---|
|
-b |
Specifies that you have included binary file names in the data file, which are preceded by a forward slash character. The tool retrieves the actual values from the file referenced. |
|
-c |
Tells the tool to proceed in spite of errors. The errors will be reported. (If you do not use this option, the tool stops when it encounters an error.) |
|
-D "binddn" |
When authenticating to the directory, specifies doing so as the entry is specified in binddn. Use this with the |
|
-E "character_set" |
Specifies native character set encoding. See Chapter 8, "Globalization Support in the Directory" |
|
-h ldaphost |
Connects to ldaphost, rather than to the default host, that is, your local computer. ldaphost can be a computer name or an IP address. |
|
-K |
Same as -k, but performs only the first step of the kerberos bind |
|
-k |
Authenticates using Kerberos authentication instead of simple authentication. To enable this option, you must compile with KERBEROS defined. You must already have a valid ticket granting ticket. |
|
|
Instructs the tool to send the |
|
-n |
Shows what would occur without actually performing the operation. |
|
-O ref_hop_limit |
Specifies the number of referral hops that a client should process. The default value is 5. |
|
-p ldapport |
Connects to the directory on TCP port ldapport. If you do not specify this option, the tool connects to the default port (389). |
|
-P wallet_password |
Specifies wallet password required for one-way or two-way SSL connections |
|
-T |
Sets the number of threads for concurrently processing entries |
|
-U SSLAuth |
Specifies SSL Authentication Mode: |
|
-v |
Specifies verbose mode |
|
-V ldap_version |
Specifies the version of the LDAP protocol to use. The default value is 3, which causes the tool to use the LDAP v3 protocol. A value of 2 causes the tool to use the LDAP v2 protocol. |
|
-w password |
Provides the password required to connect |
|
-W wallet_location |
Specifies wallet location required for one-way or two-way SSL connections. For example, on UNIX, you could set this parameter as follows: -W "file:/home/my_dir/my_wallet" On Windows NT, you could set this parameter as follows: -W "file:C:\my_dir\my_wallet" |
The ldapbind command-line tool enables you to see whether you can authenticate a client to a server.
ldapbind uses this syntax:
ldapbind [arguments]
| Optional Arguments | Description |
|---|---|
|
-D "binddn" |
When authenticating to the directory, specifies doing so as the entry specified in binddn. Use this with the |
|
-E ".character_set" |
Specifies native character set encoding. See Chapter 8, "Globalization Support in the Directory". |
|
-h ldaphost |
Connects to ldaphost, rather than to the default host, that is, your local computer. ldaphost can be a computer name or an IP address. |
|
-n |
Shows what would occur without actually performing the operation |
|
-p ldapport |
Connects to the directory on TCP port ldapport. If you do not specify this option, the tool connects to the default port (389). |
|
-P wallet_password |
Specifies the wallet password required for one-way or two-way SSL connections |
|
-U SSLAuth |
Specifies SSL authentication mode: |
|
-V ldap_version |
Specifies the version of the LDAP protocol to use. The default value is 3, which causes the tool to use the LDAP v3 protocol. A value of 2 causes the tool to use the LDAP v2 protocol. |
|
-w password |
Provides the password required to connect |
|
-W wallet_location |
Specifies wallet location required for one-way or two-way SSL connections. For example, on UNIX, you could set this parameter as follows: -W "file:/home/my_dir/my_wallet" On Windows NT, you could set this parameter as follows: -W "file:C:\my_dir\my_wallet" |
The ldapdelete command-line tool enables you to remove entire entries from the directory that you specify in the command line.
ldapdelete uses this syntax:
ldapdelete[arguments] ["entry_DN"| -f input_filename]
The following example uses port 389 on a host named myhost.
ldapdelete -p 389 -h myhost "ou=EuroSInet Suite, o=IMC, c=US"
| Optional Argument | Description |
|---|---|
|
-D "binddn" |
When authenticating to the directory, uses a full DN for the binddn parameter; typically used with the |
|
-d debug-level |
Sets the debugging level. See "Setting Debug Logging Levels by Using the OID Control Utility". |
|
-E "character_set" |
Specifies native character set encoding. See Chapter 8, "Globalization Support in the Directory". |
|
-f input_filename |
Specifies the input filename |
|
-h ldaphost |
Connects to ldaphost, rather than to the default host, that is, your local computer. ldaphost can be a computer name or an IP address. |
|
-k |
Authenticates using authentication instead of simple authentication. To enable this option, you must compile with Kerberos defined. You must already have a valid ticket granting ticket. |
|
|
Instructs the tool to send the |
|
-n |
Shows what would be done, but doesn't actually delete |
|
-O ref_hop_limit |
Specifies the number of referral hops that a client should process. The default value is 5. |
|
-p ldapport |
Connects to the directory on TCP port ldapport. If you do not specify this option, the tool connects to the default port (389). |
|
-P wallet_password |
Specifies wallet password required for one-way or two-way SSL connections |
|
-U SSLAuth |
Specifies SSL authentication mode: |
|
-v |
Specifies verbose mode |
|
-V ldap_version |
Specifies the version of the LDAP protocol to use. The default value is 3, which causes the tool to use the LDAP v3 protocol. A value of 2 causes the tool to use the LDAP v2 protocol. |
|
-w password |
Provides the password required to connect. |
|
-W wallet_location |
Specifies wallet location required for one-way or two-way SSL connections. For example, on UNIX, you could set this parameter as follows: -W "file:/home/my_dir/my_wallet" On Windows NT, you could set this parameter as follows: -W "file:C:\my_dir\my_wallet" |
The ldapmoddn command-line tool enables you to modify the DN or RDN of an entry.
ldapmoddn uses this syntax:
ldapmoddn [arguments]
The following example uses ldapmoddn to modify the RDN component of a DN from "cn=mary smith" to "cn=mary jones". It uses port 389, and a host named myhost.
ldapmoddn -p 389 -h myhost -b "cn=mary smith,dc=Americas,dc=imc,dc=com" -R
"cn=mary jones"
| Mandatory Argument | Description |
|---|---|
|
-b "basedn" |
Specifies DN of the entry to be moved |
| Optional Argument | Description |
|---|---|
|
-D "binddn" |
When authenticating to the directory, do so as the entry is specified in binddn. Use this with the |
|
-E "character_set" |
Specifies native character set encoding. See Chapter 8, "Globalization Support in the Directory". |
|
-f filename |
Specifies the input filename |
|
-h ldaphost |
Connects to ldaphost, rather than to the default host, that is, your local computer. ldaphost can be a computer name or an IP address. |
|
|
Instructs the tool to send the |
|
-N newparent |
Specifies new parent of the RDN |
|
-O ref_hop_limit |
Specifies the number of referral hops that a client should process. The default value is 5. |
|
-p ldapport |
Connects to the directory on TCP port ldapport. If you do not specify this option, the tool connects to the default port (389). |
|
-P wallet_password |
Specifies wallet password required for one-way or two-way SSL connections |
|
-r |
Specifies that the old RDN is not retained as a value in the modified entry. If this argument is not included, the old RDN is retained as an attribute in the modified entry. |
|
-R newrdn |
Specifies new RDN |
|
-U SSLAuth |
Specifies SSL authentication mode: |
|
-V ldap_version |
Specifies the version of the LDAP protocol to use. The default value is 3, which causes the tool to use the LDAP v3 protocol. A value of 2 causes the tool to use the LDAP v2 protocol. |
|
-w password |
Provides the password required to connect. |
|
-W wallet_location |
Specifies wallet location required for one-way or two-way SSL connections. For example, on UNIX, you could set this parameter as follows: -W "file:/home/my_dir/my_wallet" On Windows NT, you could set this parameter as follows: -W "file:C:\my_dir\my_wallet" |
The ldapsearch command-line tool enables you to search for and retrieve specific entries in the directory.
The ldapsearch tool uses this syntax:
ldapsearch [arguments]filter[attributes]
The filter format must be compliant with RFC-2254.
| See Also:
http://www.ietf.org/rfc/rfc2254.txt for further information about the standard for the filter format |
Separate attributes with a space. If you do not list any attributes, all attributes are retrieved.
|
Note: The ldapsearch tool does not generate LDIF output by default. To generate LDIF output from the ldapsearch command-line tool, use the |
| Mandatory Argument | Description |
|---|---|
|
-b "basedn" |
Specifies the base DN for the search |
|
-s scope |
Specifies search scope: base, one, or sub |
| Optional Argument | Description |
|---|---|
|
-A |
Retrieves attribute names only (no values) |
|
-a deref |
Specifies alias dereferencing: never, always, search, or find |
|
-B |
Allows printing of non-ASCII values |
|
-D "binddn" |
When authenticating to the directory, specifies doing so as the entry specified in binddn. Use this with the |
|
-d debug level |
Sets debugging level to the level specified (see Table 5-1) |
|
-E "character_set" |
Specifies native character set encoding. See Chapter 8, "Globalization Support in the Directory". |
|
-f file |
Performs sequence of searches listed in file |
|
-F sep |
Prints ` |
|
-h ldaphost |
Connects to ldaphost, rather than to the default host, that is, your local computer. ldaphost can be a computer name or an IP address. |
|
-L |
Prints entries in LDIF format ( |
|
-l timelimit |
Specifies maximum time (in seconds) to wait for ldapsearch command to complete |
|
|
Instructs the tool to send the |
|
-n |
Shows what would be done without actually searching |
|
-O ref_hop_limit |
Specifies the number of referral hops that a client should process. The default value is 5. |
|
-p ldapport |
Connects to the directory on TCP port ldapport. If you do not specify this option, the tool connects to the default port (389). |
|
-P wallet_password |
Specifies wallet password required for one-way or two-way SSL connections |
|
-S attr |
Sorts the results by attribute attr |
|
-t |
Writes to files in |
|
-u |
Includes user friendly entry names in the output |
|
-U SSLAuth |
Specifies the SSL authentication mode: |
|
-v |
Specifies verbose mode |
|
-w passwd |
Specifies bind passwd for simple authentication |
|
-W wallet_location |
Specifies wallet location required for one-way or two-way SSL connections. For example, on UNIX, you could set this parameter as follows: -W "file:/home/my_dir/my_wallet" On Windows NT, you could set this parameter as follows: -W "file:C:\my_dir\my_wallet" |
|
-z sizelimit |
Specifies maximum number of entries to retrieve |
Study the following examples to see how to build your own search commands.
The following example performs a base-level search on the directory from the root.
ldapsearch -p 389 -h myhost -b "" -s base -v "objectclass=*"
-b specifies base DN for the search, root in this case.-s specifies whether the search is a base search (base), one level search (one) or subtree search (sub)."objectclass=*" specifies the filter for search.The following example performs a one level search starting at "ou=HR, ou=Americas, o=IMC, c=US".
ldapsearch -p 389 -h myhost -b "ou=HR, ou=Americas, o=IMC, c=US" -s one -v
"objectclass=*"
The following example performs a subtree search and returns all entries having a DN starting with "cn=us".
ldapsearch -p 389 -h myhost -b "c=US" -s sub -v "cn=Person*"
The following example actually retrieves only two entries, even if there are more than two matches.
ldapsearch -h myhost -p 389 -z 2 -b "ou=Benefits,ou=HR,ou=Americas,o=IMC,c=US"
-s one "objectclass=*"
The following example returns only the DN attribute values of the matching entries:
ldapsearch -p 389 -h myhost -b "c=US" -s sub -v "objectclass=*" dn
The following example retrieves only the distinguished name along with the surname (sn) and description (description) attribute values:
ldapsearch -p 389 -h myhost -b "c=US" -s sub -v "cn=Person*" dn sn description
The following example retrieves entries with common name (cn) attributes that have an option specifying a language code attribute option. This particular example retrieves entries in which the common names are in French and begin with the letter R.
ldapsearch -p 389 -h myhost -b "c=US" -s sub "cn;lang-fr=R*"
Suppose that, in the entry for John, no value is set for the cn;lang-it language code attribute option. In this case, the following example does not return John's entry:
ldapsearch -p 389 -h myhost -b "c=us" -s sub "cn;lang-it=Giovanni"
The following example retrieves all user attributes and the createtimestamp and orclguid operational attributes:
ldapsearch -p 389 -h myhost -b "ou=Benefits,ou=HR,ou=Americas,o=IMC,c=US" -s sub
"cn=Person*" * createtimestamp orclguid
The following example retrieves entries modified by Anne Smith:
ldapsearch -h sun1 -b "" "(&(objectclass=*)(modifiersname=cn=Anne
Smith))"
The following example retrieves entries modified between 01 April 2001 and 06 April 2001:
ldapsearch -h sun1 -b "" "(&(objectclass=*)(modifytimestamp >= 20000401000000)

(modifytimestamp <= 20000406235959))"
Each of the following examples searches on port 389 of host sun1, and searches the whole subtree starting from the DN "ou=hr,o=acme,c=us".
The following example searches for all entries with any value for the objectclass attribute.
ldapsearch -p 389 -h sun1 -b "ou=hr, o=acme, c=us" -s subtree "objectclass=*"
The following example searches for all entries that have orcl at the beginning of the value for the objectclass attribute.
ldapsearch -p 389 -h sun1 -b "ou=hr, o=acme, c=us" -s subtree
"objectclass=orcl*"
The following example searches for entries where the objectclass attribute begins with orcl and cn begins with foo.
ldapsearch -p 389 -h sun1 -b "ou=hr, o=acme, c=us" -s subtree
"(&(objectclass=orcl*)(cn=foo*))"
The following example searches for entries in which the common name (cn) is not foo.
ldapsearch -p 389 -h sun1 -b "ou=hr, o=acme, c=us" -s subtree "(!(cn=foo))"
The following example searches for entries in which cn begins with foo or sn begins with bar.
ldapsearch -p 389 -h sun1 -b "ou=hr, o=acme, c=us" -s subtree
"(|(cn=foo*)(sn=bar*))"
The following example searches for entries in which employeenumber is less than or equal to 10000.
ldapsearch -p 389 -h sun1 -b "ou=hr, o=acme, c=us" -s subtree
"employeenumber<=10000"
This section contains these topics:
Oracle Internet Directory uses indexes to make attributes available for searches. When Oracle Internet Directory is installed, the cn=catalogs entry lists available attributes that can be used in a search. You can index only those attributes that have:
| See Also:
"Matching Rules" for the matching rules supported by Oracle Internet Directory |
If you want to use additional attributes in search filters, you must add them to the catalog entry. You can do this at the time you create the attribute by using Oracle Directory Manager. However, if the attribute already exists, then you can index it only by using the Catalog Management tool.
|
Note: To run shell script tools on the Windows operating system, you need one of the following UNIX emulation utilities:
|
The Catalog Management tool uses this syntax:
catalog.sh -connect net_service_name {add|delete} {-attr attr_name|-file
filename}
| Mandatory Argument | Description |
|---|---|
|
|
Specifies the net service name to connect to the directory database See Also: Oracle9i Net Services Administrator's Guide in the Oracle Database Documentation Library |
When you enter the catalog.sh command, the following message appears:
This tool can only be executed if you know the OiD user password.
Enter OiD password:
If you enter the correct password, the command is executed. If you give an incorrect password, the following message is displayed:
Cannot execute this tool
To effect the changes after running the Catalog Management tool, stop, then restart, the Oracle directory server.
| See Also:
"The OID Control Utility" and for instructions on starting and restarting directory servers. Note that OID Monitor must be running before you start a directory server. See "The OID Monitor" for information about starting OID Monitor. |
The ldapcompare command-line tool enables you to match attribute values you specify in the command line with the attribute values in the directory entry.
ldapcompare uses this syntax:
ldapcompare [arguments]
The following example tells you whether Person Nine's title is associate.
ldapcompare -p 389 -h myhost -b "cn=Person Nine,ou=EuroSInet Suite,o=IMC,c=US"
-a title -v associate
| Optional Arguments | Description |
|---|---|
|
-D binddn |
When authenticating to the directory, specifies doing so as the entry is specified in binddn. Use this with the |
|
-d debug-level |
Sets the debugging level. See "Setting Debug Logging Levels by Using the OID Control Utility". |
|
-E "character_set" |
Specifies native character set encoding. See Chapter 8, "Globalization Support in the Directory". |
|
-f filename |
Specifies the input filename |
|
-h ldaphost |
Connects to ldaphost, rather than to the default host, that is, your local computer. ldaphost can be a computer name or an IP address. |
|
|
Instructs the tool to send the |
|
-O ref_hop_limit |
Specifies the number of referral hops that a client should process. The default value is 5. |
|
-p ldapport |
Connects to the directory on TCP port ldapport. If you do not specify this option, the tool connects to the default port (389). |
|
-P wallet_password |
Specifies wallet password required for one-way or two-way SSL connections |
|
-U SSLAuth |
Specifies SSL authentication mode: |
|
-V ldap_version |
Specifies the version of the LDAP protocol to use. The default value is 3, which causes the tool to use the LDAP v3 protocol. A value of 2 causes the tool to use the LDAP v2 protocol. |
|
-w password |
Provides the password required to connect |
|
-W wallet_location |
Specifies wallet location required for one-way or two-way SSL connections. For example, on UNIX, you could set this parameter as follows: -W "file:/home/my_dir/my_wallet" On Windows NT, you could set this parameter as follows: -W "file:C:\my_dir\my_wallet" |
The ldapmodify tool enables you to act on attributes.
ldapmodify uses this syntax:
ldapmodify[arguments] -f filename
where filename is the name of an LDIF file written with the specifications explained the section "LDAP Data Interchange Format (LDIF) Syntax".
The list of arguments in the following table is not exhaustive.
| Optional Argument | Description |
|---|---|
|
-a |
Denotes that entries are to be added, and that the input file is in LDIF format. |
|
-b |
Specifies that you have included binary file names in the data file, which are preceded by a forward slash character. |
|
-c |
Tells ldapmodify to proceed in spite of errors. The errors will be reported. (If you do not use this option, ldapmodify stops when it encounters an error.) |
|
-D "binddn" |
When authenticating to the directory, specifies doing so as the entry is specified in binddn. Use this with the |
|
-E "character_set" |
Specifies native character set encoding. See Chapter 8, "Globalization Support in the Directory". |
|
-h ldaphost |
Connects to ldaphost, rather than to the default host, that is, your local computer. ldaphost can be a computer name or an IP address. |
|
|
Instructs the tool to send the |
|
-n |
Shows what would occur without actually performing the operation. |
|
|
Can be used with the |
|
-O ref_hop_limit |
Specifies the number of referral hops that a client should process. The default value is 5. |
|
-p ldapport |
Connects to the directory on TCP port ldapport. If you do not specify this option, the tool connects to the default port (389). |
|
-P wallet_password |
Specifies wallet password required for one-way or two-way SSL connections |
|
-U SSLAuth |
Specifies SSL authentication mode: |
|
-v |
Specifies verbose mode |
|
-V ldap_version |
Specifies the version of the LDAP protocol to use. The default value is 3, which causes the tool to use the LDAP v3 protocol. A value of 2 causes the tool to use the LDAP v2 protocol. |
|
-w password |
Overrides the default, unauthenticated, null bind. To force authentication, use this option with the |
|
-W wallet_location |
Specifies wallet location required for one-way or two-way SSL connections. For example, on UNIX, you could set this parameter as follows: -W "file:/home/my_dir/my_wallet" On Windows NT, you could set this parameter as follows: -W "file:C:\my_dir\my_wallet" |
To run modify, delete, and modifyrdn operations using the -f flag, use LDIF for the input file format (see "LDAP Data Interchange Format (LDIF) Syntax") with the specifications noted in this section:
If you are making several modifications, then, between each modification you enter, add a line that contains a hyphen (-) only. For example:
dn: cn=Barbara Fritchy,ou=Sales,o=Oracle,c=USchangetype: modifyadd: work-phonework-phone: 510/506-7000work-phone: 510/506-7001-delete: home-fax
Unnecessary space characters in the LDIF input file, such as a space at the end of an attribute value, will cause the LDAP operations to fail.
Line 1: Every change record has, as its first line, the literal dn: followed by the DN value for the entry, for example:
dn:cn=Barbara Fritchy,ou=Sales,o=Oracle,c=US
Line 2: Every change record has, as its second line, the literal changetype: followed by the type of change (add, delete, modify, modrdn), for example:
changetype: modify
or
changetype: modrdn
Format the remainder of each record according to the following requirements for each type of change:
changetype: add
Uses LDIF format (see "LDAP Data Interchange Format (LDIF) Syntax").
changetype: modify
The lines that follow this changetype consist of changes to attributes belonging to the entry that you identified previously in Line 1. You can specify three different types of attribute modifications--add, delete, and replace--which are explained next:
add:attribute nameattribute name:value1attribute name:value2...
For example:
dn:cn=Barbara Fritchy,ou=Sales,o=Oracle,c=USchangetype: modifyadd: work-phonework-phone: 510/506-7000work-phone: 510/506-7001
delete:attribute name[attribute name:value1]
For example:
dn: cn=Barbara Fritchy,ou=Sales,o=Oracle,c=USchangetype: modifydelete: home-fax
replace:attribute name[attribute name:value1...]
If you do not provide any attributes with replace, then the directory adds an empty set. It then interprets the empty set as a delete request, and complies by deleting the attribute from the entry. This is useful if you want to delete attributes that may or may not exist.
For example:
dn: cn=Barbara Fritchy,ou=Sales,o=Oracle,c=USchangetype: modifyreplace: work-phonework-phone: 510/506-7002
changetype:delete
This change type deletes entries. It requires no further input, since you identified the entry in Line 1 and specified a changetype of delete in Line 2.
For example:
dn: cn=Barbara Fritchy,ou=Sales,o=Oracle,c=USchangetype: delete
changetype:modrdn
The line following the change type provides the new relative distinguished name using this format:
newrdn: RDN
For example:
dn: cn=Barbara Fritchy,ou=Sales,o=Oracle,c=USchangetype: modrdnnewrdn: cn=BarbaraFritchy-Blomberg
This example adds a new attribute called myAttr. The LDIF file for this operation is:
dn: cn=subschemasubentry
changetype: modify
add: attributetypes
attributetypes: (1.2.3.4.5.6.7 NAME `myAttr' DESC `New attribute definition'
EQUALITY caseIgnoreMatch SYNTAX
`1.3.6.1.4.1.1466.115.121.1.15' )
On the first line, enter the DN specifying where this new attribute is to be located. All attributes and object classes they are stored in cn=subschemasubentry.
The second and third lines show the proper format for adding a new attribute.
The last line is the attribute definition itself. The first part of this is the object identifier number: 1.2.3.4.5.6.7. It must be unique among all other object classes and attributes. Next is the NAME of the attribute. In this case the attribute NAME is myAttr. It must be surrounded by single quotes. Next is a description of the attribute. Enter whatever description you want between single quotes. At the end of this attribute definition in this example are optional formatting rules to the attribute. In this case we are adding a matching rule of EQUALITY caseIgnoreMatch and a SYNTAX of Directory String. This example uses the object ID number of 1.3.6.1.4.1.1466.115.121.1.15 instead of the SYNTAXES name which is "Directory String".
Put your attribute information in a file formatted like this example. Then run the following command to add the attribute to the schema of your Oracle directory server.
ldapmodify -h yourhostname -p 389 -D "orcladmin" -w "welcome" -v -f
/tmp/newattr.ldif
This ldapmodify command assumes that your Oracle directory server is running on port 389, that your super user account name is orcladmin, that your super user password is welcome and that the name of your LDIF file is newattr.ldif. Substitute the host name of your computer where you see yourhostname.
If you are not in the directory where the LDIF file is located, then you must enter the full directory path to the file at the end of your command. This example assumes that your LDIF file is located in the /tmp directory.
The ldapmodifymt command-line tool enables you to modify several entries concurrently.
ldapmodifymt uses this syntax:
ldapmodifymt -T number_of_threads [arguments] -ffilename
where filename is the name of an LDIF file written with the specifications explained the section "LDAP Data Interchange Format (LDIF) Syntax".
| See Also:
"ldapmodify Syntax" for additional formatting specifications used by ldapmodifymt |
The following example uses five concurrent threads to modify the entries in the file myentries.ldif.
ldapmodifymt -T 5 -h node1 -p 3000 -f myentries.ldif
|
Note: The ldapmodifymt tool logs error messages in the file |
| Optional Argument | Description |
|---|---|
|
-a |
Denotes that entries are to be added, and that the input file is in LDIF format. (If you are running ldapadd, this flag is not required.) |
|
-b |
Specifies that you have included binary file names in the data file, which are preceded by a forward slash character. |
|
-c |
Tells ldapmodify to proceed in spite of errors. The errors will be reported. (If you do not use this option, ldapmodify stops when it encounters an error.) |
|
-D "binddn" |
When authenticating to the directory, specifies doing so as the entry is specified in binddn. Use this with the |
|
-E "character_set" |
Specifies native character set encoding. See Chapter 8, "Globalization Support in the Directory". |
|
-h ldaphost |
Connects to ldaphost, rather than to the default host, that is, your local computer. ldaphost can be a computer name or an IP address. |
|
|
Instructs the tool to send the |
|
-n |
Shows what would occur without actually performing the operation. |
|
-O ref_hop_limit |
Specifies the number of referral hops that a client should process. The default value is 5. |
|
-p ldapport |
Connects to the directory on TCP port ldapport. If you do not specify this option, the tool connects to the default port (389). |
|
-P wallet_password |
Specifies wallet password required for one-way or two-way SSL connections |
|
-T |
Sets the number of threads for concurrently processing entries |
|
-U SSLAuth |
Specifies SSL authentication mode: |
|
-v |
Specifies verbose mode |
|
-V ldap_version |
Specifies the version of the LDAP protocol to use. The default value is 3, which causes the tool to use the LDAP v3 protocol. A value of 2 causes the tool to use the LDAP v2 protocol. |
|
-w password |
Overrides the default, unauthenticated, null bind. To force authentication, use this option with the -D option. |
|
-W wallet_location |
Specifies wallet location required for one-way or two-way SSL connections. For example, on UNIX, you could set this parameter as follows: -W "file:/home/my_dir/my_wallet" On Windows NT, you could set this parameter as follows: -W "file:C:\my_dir\my_wallet" |
This section contains these topics:
|
Note: To run shell script tools on the Windows operating system, you need one of the following UNIX emulation utilities:
|
The bulkdelete command-line tool enables you to delete a subtree efficiently. It can be used when both an Oracle directory server and Oracle directory replication servers are in operation. It uses a SQL interface to benefit performance. For this release, the bulkdelete tool runs on only one node at a time.
This tool does not support filter-based deletion. That is, it deletes an entire subtree below the root of the subtree. If the base DN is a user-added DN, rather than a DN created as part of the installation of the directory, it is included in the delete. You must restrict LDAP activity against the subtree during deletion.
The bulkdelete tool uses this syntax:
bulkdelete.sh -connect net_service_name -base "base_dn" -size number_of_entries
-encode "character_set"
| Mandatory Argument | Description |
|---|---|
|
|
Specifies the net service name to connect to the directory database See Also: Oracle9i Net Services Administrator's Guide in the Oracle Database Documentation Library |
|
|
Specifies the base DN of the subtree to be deleted |
| Optional Argument | Description |
|---|---|
|
|
Specifies the number of entries to be committed as a part of one transaction. |
|
|
Specifies native character set encoding. See Also: Chapter 8, "Globalization Support in the Directory". |
The bulkload command-line tool uses Oracle SQL*Loader to create directory entries from data residing in or created by other applications. When using bulkload, you specify any options and the input filename. Bulkload expects an empty directory and will either fail or overwrite if there are existing entries.The bulkload tool expects the input file to be in LDIF.
The bulkload tool uses this syntax:
bulkload.sh -connect net_service_name [-check] [-encode] [-generate] [-load]
[-numthread n] [-parallel] [-restore] absolute_path_to_ldif.file
| Mandatory Argument | Description |
|---|---|
|
|
Specifies the net service name defined in the See Also: Oracle9i Net Services Administrator's Guide in the Oracle Database Documentation Library |
| Optional Argument | Description |
|---|---|
|
|
Checks LDAP schema for inconsistencies and for existence of duplicate DNs in the file |
|
|
Specifies native character set encoding. See Also: Chapter 8, "Globalization Support in the Directory". |
|
|
Creates files suitable for loading into Oracle Internet Directory |
|
|
Loads files resulting from generate phase into specified database |
|
|
Specifies the number of threads to use in |
|
|
Specifies that the loading should be done in parallel |
|
|
Takes the operational attributes, such as |
Bulk loading must be performed when directory server instances are not running.
| See Also:
Chapter 5, "Oracle Directory Server Administration" for instructions on stopping directory server instances |
The LDIF data file path must be fully specified for check or generate operations.
|
Note: If bulkload.sh is not used to populate the directory, then $ORACLE_HOME/ldap/admin/oidstats.sh must be run to ensure there will be no significant search performance degradation. |
After generating a file with the generate option, you can use the load option to load multiple computers with the identical SQL*Loader file. Do this only when creating a new replica node.
The current version of bulkload does not allow you to specify the connection information for all of the nodes in one command.
When you load the same data into multiple nodes in a replicated network, ensure that the orclGUID parameter (global IDs) is consistent across all the nodes. You can accomplish this by generating the bulkload data file once only (using the -generate option), and then using the same data file to load the other nodes (using the -load option).
The bulkmodify command-line tool enables you to modify a large number of existing entries in an efficient way. The bulkmodify tool supports the following:
objectclass=*, objectclass=oneclass, or telephonenumber=*.The bulkmodify tool performs schema checking on the specified attribute name and value pair during initialization. All entries that meet the following criteria are modified:
The Oracle directory server and Oracle directory replication server may be running concurrently while bulk modification is in progress, but the bulk modification does not affect the replication server. You must perform bulk modification against all replicas.
You must restrict user access to the subtree during bulk modification. If necessary, ACI restriction can be applied to the subtree being updated by bulkmodify.
You cannot use bulkmodify to add a value to single-valued attributes that already contain one value. If a second value is added, you must alter the directory schema to make that attribute multi-valued.
The bulkmodify tool uses this syntax:
bulkmodify -c net_service_name -b "base_dn" {-a|-r} attr_name -v att_value [-f
filter] [-s size]
| Mandatory Argument | Description |
|---|---|
|
|
Specifies the net service name of the directory database See Also: Oracle9i Net Services Administrator's Guide in the Oracle Database Documentation Library |
|
|
Specifies the base DN of the subtree to be modified |
|
|
Specifies the attribute name for addition |
|
|
Specifies the attribute name for replacement |
|
|
Specifies the attribute value for either addition or replacement |
| Optional Argument | Description |
|---|---|
|
|
Specifies the filter to be used |
|
|
Specifies the number of entries to be committed as a part of one transaction. If not specified, default is 100. |
|
|
Specifies native character set encoding. See Chapter 8, "Globalization Support in the Directory". |
The filter specified with the -f option must contain a single attribute.
If a filter is not specified, the default filter objectclass=* is assumed.
There can be only one attribute name specified in the -a or -r option in each execution.
There can be only one value specified in the -v option in each execution. For example, the following bulkmodify command adds the telephone number 408-123-4567 to the entries of all employees who have Anne Smith as their manager:
bulkmodify -c my_database -b "c=US" -a telephoneNumber -v "408-123-4567" -f
"manager=Anne Smith"
To assure that the modified entries are read, after completing the bulkmodify procedure, restart the Oracle Internet Directory server.
The ldifwrite command-line tool enables you to convert to LDIF all or part of the information residing in an Oracle Internet Directory. This makes that information available for loading into a new node in a replicated directory or into another node for backup storage.
The ldifwrite tool performs a subtree search, including all entries below the specified DN, including the DN itself.
The ldifwrite tool uses this syntax:
ldifwrite -c net_service_name -b "base_DN" -f filename
| Mandatory Argument | Description |
|---|---|
|
|
Specifies the net service name of the directory that is the source of the data, as defined in the See Also: Oracle9i Net Services Administrator's Guide in the Oracle Database Documentation Library |
|
|
Specifies the base of the subtree to be written out in LDIF format |
|
|
Specifies the name of the LDIF file to be created |
| Optional Argument | Description |
|---|---|
|
-E " |
The following example writes all the entries under ou=Europe, o=imc, c=us into the output1.ldi file.
ldifwrite -c nldap -b "ou=Europe, o=imc, c=us" -f output1.ldi
All the arguments are mandatory.
The LDIF file and the intermediate file are always written to the current directory.
The ldifwrite tool includes the operational attributes of each entry in the directory, including createtimestamp, creatorsname, and orclguid.
When prompted for the OiD password, enter the password of the underlying ODS user. The default password is ods.
When a replication conflict arises, Oracle directory replication server places the change in the retry queue and tries to apply it from there for a specified number of times. If it fails after that specified number, then the replication server puts the change in the human intervention queue. From there, the replication server repeats the change application process at less frequent intervals while awaiting your action.
At this point, you need to:
Two tools assist in this process. Use the OID Reconciliation tool to synchronize conflicting changes, and the Human Intervention Queue Manipulation tool to move changes from the human intervention queue to either the retry queue or the purge queue.
This section contains these topics:
The Human Intervention Queue Manipulation Tool enables you to move the changes from the human intervention queue to either the retry queue or the purge queue. Moving the change to the purge queue means that there are no further attempts to re-apply the change log entry. Perform the following general steps to address changes in the human intervention queue:
|
Note: To run shell script tools on the Windows operating system, you need one of the following UNIX emulation utilities:
|
To place a change back into the retry queue, use this syntax:
hiqretry.sh -connect net_service_name [-start change_number]

[-end change_number] [-equal change_number] -supplier supplier_node
The arguments are:
To place a change into the purge queue, use this syntax:
hiqpurge.sh -connect net_service_name [-start change_number] [-end change_
number] [-equal change_number] -supplier supplier_node
Arguments are:
|
Note: When using hiqretry.sh or hiqpurge.sh, if you do not want all changes to be moved, then you must supply either the |
The following examples illustrate how to use the Human Intervention Queue Manipulation Tool.
Suppose that, after analyzing the replication log, you decide to do the following:
To do this, you issue these two commands:
hiqretry.sh -connect oiddb1 -start 10324 -end 10579 -supplier ldap_rep1
hiqpurge.sh -connect oiddb1 -start 10581 -end 10623 -supplier ldap_repl
The first command moves changes originating in ldap_rep1 with change numbers from 10324 to 10579 back to the retry queue. The second command deletes changes that originate in the supplier ldap_repl and that have change numbers from 10581 to 10623.
The following command moves the change with change number equal to 10519 back to the retry queue.
hiqretry.sh -connect oiddb1 -equal 10519 -supplier ldap_repl
The following command moves all the changes with change number greater or equal to 10324 back to the retry queue.
hiqretry.sh -connect oiddb1 -start 10324 -supplier ldap_repl
The following command moves all the changes with change numbers less than or equal to 10579 back to the retry queue.
hiqretry.sh -connect oiddb1 -end 10579 -supplier ldap_repl
The following command includes no options. It moves all changes that originate in the supplier ldap_repl from the human intervention queue to the retry queue.
hiqretry.sh -connect oiddb1 -supplier ldap_repl
When the Oracle directory replication server encounters inconsistent data, you can use the OID Reconciliation Tool to synchronize the entries on the consumer with those on the supplier. When you do this, perform the following general steps:
|
Note: To run shell script tools on the Windows operating system, you need one of the following UNIX emulation utilities:
|
The OID Reconciliation Tool uses this syntax:
oidreconcile -h supplier_host -c consumer_host [-P supplier_port] [-p consumer_
port] [-s scope] -b "basedn" -W supplier_password -w consumer_password [-T
thread]
When the OID Reconciliation Tool receives the specified DN, it compares the orclGuid of the parent DN on both the supplier and the consumer.
If the global identification (orclGuid) of both parents match, and the option -s subtree is set, then the OID Reconciliation Tool does the following:
For example, the following command replaces the whole subtree starting from "ou=hr,o=acme,c=us" on the consumer with the equivalent subtree on the supplier:
oidreconcile -h supplier_host -P 389 -c consumer_host -p 389

-b "ou=hr,o=acme,c=us" -s subtree -W supplier_password -w consumer_password
If the global identification (orclGuid) of both parents ("o=acme,c=us") match, and -s subtree is not set, then the OID Reconciliation Tool replaces only the entry itself on the consumer node with the specified entry from the supplier node.
For example, the following command, in which the option "-s subtree" is not set, replaces only the specified entry, "ou=hr,o=acme,c=us".
oidreconcile -h supplier -P 389 -c consumer -p 389 -b "ou=hr, o=acme, c=us"

-W supplier_password -w consumer_password
The next figure helps to explain how this process works.
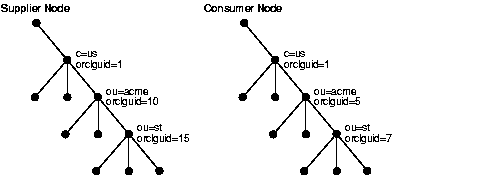
This figure shows two DITs, one on a supplier node and one on a consumer node. In the DIT on the supplier node, the orclGuid for c=us is 1 (one), the orclGuid for o=acme is 10, and the orclGuid for ou=st is 15. On the consumer node, the orclGuid for o=acme is 5, and the orclGuid for ou=st is 7.
The orclGuids for the parent of o=acme,c=us--namely, c=us--on both the supplier and the consumer match. Therefore, the following command replaces all entries under o=acme,c=us on the consumer with the corresponding ones on supplier:
oidreconcile -h supplier -c consumer -b "o=acme, c=us" -s subtree -W supplier_
password -w consumer_password
If the orclGuid of both parents does not match, then the OID Reconciliation Tool does not perform the reconciliation. Instead, it tells the user the first ancestor on the consumer in which the orclGuid matches that of the same ancestor on the supplier.
For example, in the previous example, suppose you were to run the following command:
oidreconcile -h supplier -c consumer -b "ou=st, o=acme, c=us" -s subtree

-W supplier_password -w consumer_password
This command would result in a message that the first ancestor of ou=st in which the match of the orclGuid is o=acme,c=us. This message means that you should use o=acme,c=us as basedn argument for oidreconcile.
This section contains these topics:
Use oidmuplf.sh to load mapping and configuration information when you are synchronizing directories.
oidmuplf.sh -name  Profile_Name


-config which_configset_the_profile_is_associated_with
-host  <LDAP Server host
-port  <LDAP server port
-binddn  < Dn that can modify the profile  ( default  = cn=orcladmin)
-bindpass <  password to the binddn ( default = welcome)
-attrtype  <  "MAP" / "ATTR"
-filename < Complete path name of the file to be uploaded
| See Also:
Chapter 28, "The Oracle Directory Synchronization Service" for a description of when to use oidmuplf.sh |
You can create a synchronization profile by using the command-line tool oidmcrep.sh. This tool is in the directory $ORACLE_HOME/ldap/admin/. The following lines show the syntax for this tool, and Table A-2 explains its arguments.
oidmcrep.sh -name profile_name \
[ -type [IMPORT | EXPORT ] [ -agentpwd connector_password ] \
[ -config configset_to_associate_with_this_profile ] \
[ -host directory_server_host ] \
[ -port directory_server_port ] \
[ -binddn super_user_dn (default cn=orcladmin ) ] \
[ -bindpass   bind_password (default=welcome) ] \
[ -retry   max_retry_count_on_synchronization_errors > ]\
[ -poll polling_interval_for_synchronization ] \
[ -conndirurl  connected_directory_url] \
[ -conndiracct connected_directory_acct_info > ]\
[ -conndirpwd connected_directory_account_password ] \
[ -execmd command_line_for_connector ]\
[ -iftype interface_type]      \
[ -condirfilter connected_directory_matching_filter ]\
[ -oidfilter oid_matching_filter ] \
[ -U ssl_authentication_mode> ]\
[ -W wallet_location ]   [ -P wallet_password ]
When the integration server is invoked with configuration set 2 in this command line argument, this connector is run. You can see a full description by invoking oidmcrep.sh with the -help argument.
You can deregister a synchronization profile by using the command-line tool oidmdelp.sh. This tool is in the directory $ORACLE_HOME/ldap/admin/.
The following example deregisters a profile entry and dissociates it from the configuration set 2 (config 2) entry:
oidmdelp.sh name HRMS config 2
In a client-only installation where the OID Monitor and OID Control Utility are not available, you can start the directory integration server without the oidctl tool. To stop the server, use the stopodis.sh tool.
The path name for this tool is: $ORACLE_HOME/ldap/admin/stopodis.sh
The usage is:
$ORACLE_HOME/ldap/admin/stopodis.sh


[ -host directory_server_host ]
[ -port LDAP_server_port ]
[ -binddn super_user_dn (default cn=orcladmin ) ]
[ -bindpass   bind_password (default=welcome) ]
-instance instance_number_to_stop
|
Note: To run shell script tools on the Windows operating system, you need one of the following UNIX emulation utilities:
|
The schemasync enables you to synchronize schema elements--namely attributes and object classes--between an Oracle directory server and third-party LDAP directories.
The usage for schemasync is as follows:
$ORACLE_HOME/bin/schemasync


-srchost source_LDAP_directory
-srcport source_LDAP_port_numbert
-srcdn privileged_DN_in_source_directory_to_access_schema
-srcpwd password
-dsthost destination_LDAP_directory
-dstport destination_LDAP_port
-dstdn privileged_dn_in_destination_directory_to_access_schema
-dstpwd password
[-ldap]
The errors that occur during schema synchronization are logged in the
following log files:
Use the Provisioning Subscription Tool to administer provisioning profile entries in the directory. More specifically, use it to perform these activities:
The Provisioning Subscription Tool shields the location and schema details of the provisioning profile entries from the callers of the tool. From the callers' perspective, the combination of an application and a subscriber uniquely identify a provisioning profile. The constraint in the system is that there can be only one provisioning profile for each application for each subscriber.
|
Note: To run shell script tools on the Windows operating system, you need one of the following UNIX emulation utilities:
|
The name of the executable is oidProvTool, located in $ORACLE_HOME/bin.
To invoke this tool, use this command:
oidprovtool param1=param1_value param2=param2_value param3=param3_value ...
The Provisioning Subscription Tool accepts the following parameters:
The OID Database Password Utility syntax is:
oidpasswd [connect=net_service_name]
The OID Database Password Utility prompts you for the current password. Type the current password, then the new password, then a confirmation of the new password.
The OID Database Password Utility assumes by default that the password being changed is that of the local database (as defined by ORACLE_HOME and ORACLE_SID). If you are changing the password on a remote database, you must use the connect=net_service_name option.
For example:
$ oidpasswd
current password: ods
new password: newsupersecret
confirm password: newsupersecret
password set.
$
Use the oidstats.sh tool to analyze the various database ods schema objects to estimate the statistics. It is located in the following directory: $ORACLE_HOME/ldap/admin/. The tool will prompt for 'ods' database user password. You must run this utility whenever there are significant changes in directory data--including the initial load of data into the directory.
If you load data into the directory by any means other than the bulkload tool (bulkload.sh), then you must run the OID Database Statistics Collection tool after loading. Statistics collection is essential for the Oracle Optimizer to choose an optimal plan in executing the queries corresponding to the LDAP operations. You can run OID Database Statistics Collection tool at any time, without shutting down any of the OID daemons.
|
Note: If you do not use the bulkload utility to populate the directory, then you must run the oidstats.sh tool to avoid significant search performance degradation. |
|
Note: To run shell script tools on the Windows operating system, you need one of the following UNIX emulation utilities:
|
The OID Database Statistics Collection Tool uses this syntax:
oidstats.sh [ -connect net_service_name ]
            [ -all ]
            [ -cat catalog_name ]
            [ -pct percent ]
           [ -help | -usage ]
The parameters are:
Each of the following examples assume that the ORACLE_SID and the default user name and password are in effect.
The following example estimates statistics based on 100 percent sample data of all tables:
oidstats.sh -all -pct 100
The following example estimates statistics based on 50 percent sample data of all tables:
oidstats.sh -all -pct 50
The following example estimates statistics based on 50 percent sample data of CT_CN table:
oidstats.sh -cat ct_cn -pct 50
The following example estimates statistics based on 40 percent sample data of all catalog tables:
oidstats.sh -cat all -pct 40
Use the OID Migration Tool when you are migrating data from application-specific repositories into Oracle Internet Directory. The OID Migration Tool produces an LDIF file, which is suitable for loading into a directory server by using the standard command-line tools. The input to this tool is a pseudo-LDIF file containing substitution variables. The tool is called ldifmigrator and it exists in ORACLE_HOME/bin.
The syntax of the ldifmigrator tool is as follows:
$ ldifmigrator Input_file=my_users.dat" "Output_file=my_users.ldif"


[-lookup "Host=directoryName"
["Port=portnumber"]
"DN=bindDn"
["Password=password"]
["Subscriber=subscribername"]]
{"s_SubVar1=val1" ..."s_SubVarN=valN"  }
Table A-5 describes the command-line parameters used by this tool in further detail:
The following table describes a set of pre-defined substitution variables. If it is running in the lookup mode, the OID Migration Tool can automatically determine the values of these variables by looking them up Oracle Internet Directory.
The OID Migration Tool obtains the values of the pre-defined substitution variables only in the lookup mode. Users can override the value of any of the previous variables in the `lookup' mode by specifying the variable and a different value in the command line. The user can also specify substitution variables other than the ones listed in the following table and their values in the command line.
Consider the input file sample.dat whose contents are as follows:
dn: cn=jdoe, %s_UserContainerDN%
sn: Doe
%s_UserNicknameAttribute%: jdoe
objectClass: inetOrgPerson
objectClass: orclUserV2
title: Member of Technical Staff
homePhone: 415-584-5670
homePostalAddress: 234 Lez Drive$ Redwood City$ CA$ 94402
ou: %s_UserOrganization%
The following sections describe how the OID Migration Tool can be used to transform the previous template into a valid LDIF ready to be loaded into Oracle Internet Directory.
In this example, the Oracle directory server is present in the environment, and the deployment wants the migration tool to lookup the directory server to figure out certain substitution variables. It will issue the following command:
$ldifmigrator "input_file=sample.dat" "output_file=sample.ldif" -lookup
"host=ldap.acme.com" "subscriber=acme" "s_UserOrganization=Development"
On executing this command, the directory server running on ldap.acme.com will be contacted and the following values of the substitution variables for the subscriber "acme" will be obtained:
| Variable Name | Value Obtained from ldap.acme.com |
|---|---|
|
% s_UserContainerDN% |
cn=Users,o=acme,dc=com |
|
%s_UserNicknameAttribute% |
uid |
In addition to these variables, the OID Migration Tool will also honor the command-line variable called s_UserOrganization and substitute all occurrences of it with the value `Development'. In this case the output of the tool stored in sample.ldif will be as follows (the substituted values are shown in italics):
dn: cn=jdoe,cn=Users,o=Acme,dc=com
sn: Doe
uid: jdoe
objectClass: inetOrgPerson
objectClass: orclUserV2
title: Member of Technical Staff
homePhone: 415-584-5670
homePostalAddress: 234 Lez Drive$ Redwood City$ CA$ 94402
ou: Development
The same output as shown in the previous example could have been obtained by specifying all of the values in the command line (without using the -lookup option). The following command line example describes how one would use the Migration tool without the lookup mode:
$ldifmigrator "input_file=sample.dat" "output_file=sample.ldif"  "s_
UserContainerDN=cn=Users,o=Acme,dc=com" "s_UserNicknameAttribute=uid" "s_
UserOrganization=Development"
In some cases, a deployment would like to use the OID Migration Tool in the lookup mode but would also like to override the values of one or more of the pre-defined substitution variables. This can be done by specifying the override value in the command line. The following command line shows how one can set the UserNickNameAttribute to `cn' overriding the default of `uid':
$ldifmigrator "input_file=sample.dat" "output_file=sample.ldif" -lookup
"host=ldap.acme.com" "subscriber=acme" "s_UserOrganization=Development"

"s_UserNicknameAttribute=cn"
On executing this command, the directory server running on ldap.acme.com will be contacted and the following values of the substitution variables for the subscriber "acme" will be obtained:
| Variable Name | Value Obtained from ldap.acme.com |
|---|---|
|
% s_UserContainerDN% |
cn=Users,o=acme,dc=com |
|
%s_UserNicknameAttribute% |
uid (this is over-ridden by command line specification) |
Since s_UserNicknameAttribute is specified on the command line, the OID Migration Tool will ignore the value obtained from the directory and use the value specified in the command line. In addition to these variables, the migration tool will also honor the command-line variable called s_UserOrganization and substitute all occurrences of it with the value `Development'. In this case the output of the tool stored in sample.ldif will be as follows (the substituted values are shown in italics):
dn: cn=jdoe,cn=Users,o=Acme,dc=com
sn: Doe
cn: jdoe
objectClass: inetOrgPerson
objectClass: orclUserV2
title: Member of Technical Staff
homePhone: 415-584-5670
homePostalAddress: 234 Lez Drive$ Redwood City$ CA$ 94402
ou: Development
The OID Migration Tool can display these error messages:
When an error condition occurs, the log messages are logged to this file:
ORACLE_HOME/ldap/install/LDIFMig_YYYY_MM_DD_HH_SS.log.
|
 Copyright © 1999, 2002 Oracle Corporation. All Rights Reserved. |
|

